Sony FX3 Integration
The Sony FX3 is a full-frame cinema-line mirrorless camera controlled from a Cyanview RCP or via a RIO (local or remote). It uses the same Sony protocol as the wider Sony Alpha range, but supports two connection methods — USB and IP — and is popular on gimbals for REMI and remote productions. The Sony protocol enables full remote control of exposure, picture profile settings, and recording.
Supported Models
- ILME-FX3 — FX3
- ILME-FX3A — FX3A (requires RIO version 25.10.1beta2 or above)
- ILME-FX30 — FX30
The FX3 shares the Sony USB protocol with the broader Sony Alpha mirrorless range. See the Sony Alpha page for the full list of supported models and the shared controls reference.
Compatibility Requirements
- Camera firmware: ensure the camera is on the latest available firmware. The FX3 requires firmware version
3.00or above. Sony refreshes their SDK approximately four times per year; keeping the RCP/RIO firmware current is required for continued compatibility. - RCP / RIO firmware: use the latest release (including beta/RC versions delivered as SWU files). The FX3 requires version
23.8.1or above; the FX3A requires25.10.1beta2or above. The Sony protocol is implemented at OS level, not just application level.
Supported Controls
| Control | Notes | FX3 / FX3A / FX30 |
|---|---|---|
| Iris | Manual and Auto | ✔ |
| ISO | Manual and Auto (+ offset). Native ISO only, extended ISO not supported | ✔ |
| Shutter | Manual, Auto | ✔ |
| White Balance | R/B mapped to AB-GM and Color Temp | ✔ |
| Black Balance | Master Black only | ✔ |
| Black Gamma | Range (1–3, Narrow–Wide) and Master Gamma | ✔ |
| Detail | Level, Crisp, Level Dep, H/Ratio, and Mix | ✔ |
| Knee | Point and Slope, ON/OFF | ✔ |
| Saturation / Hue | ✔ | |
| Color Space | Movie, Still, SCinetone, Cinema, Pro, ITU709, BlackWhite, SGamut3Cine, SGamut3 | ✔ |
| OETF | Movie, Still, SCinetone, Cine1, Cine2, Cine3, Cine4, ITU709, SLog3, HLG, HLG1, HLG2, HLG3 | ✔ |
| Multi Matrix | Hue and Saturation on 6 vectors: Magenta, Blue, Cyan, Green, Yellow, Red | ✔ |
| Record | ON/OFF + status | ✔ |
| Tally | Not built into the camera — add via RIO port with CY-CBL-6P-PWR | — |
Tally is not present on the camera, but it can be added via a RIO port as a Tally output using a CY-CBL-6P-PWR. See the Tally configuration page.
Connection
The FX3 can be connected two ways:
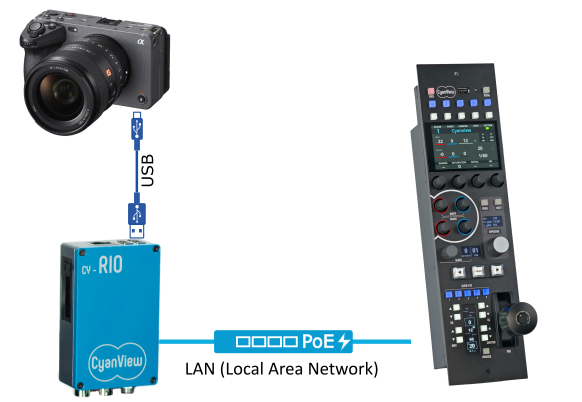
- USB: connect the camera USB port directly to a USB port on the RCP, or to a USB port on a RIO (the RIO relays control over the network to the RCP). This is the most common setup for gimbals and REMI, where a RIO sits on the gimbal with the camera.
- IP: connect the camera to the network through a USB-to-Ethernet adapter (USB-LAN tethering) and control it directly over IP from the RCP, following a one-time pairing step.
USB-Ethernet Adapter Compatibility
IP control relies on a USB-to-Ethernet adapter. Unlike the FX6 — where compatible dongles have become hard to find — the FX3 works with a wide range of adapters, so it is worth simply trying the ones you have.
The key requirement is that the adapter must be gigabit (1 Gb). Faster 2.5 Gb and 5 Gb adapters do not work.
If you configure the network settings and nothing appears, the dongle is not compatible — try another gigabit adapter.
Required Accessories
Optional:
- CY-CBL-6P-PWR — required to add Tally output via a RIO port (Tally is not built into the camera).
- USB-to-Ethernet adapter — required for IP control (see adapter compatibility).
Configuration
The FX3 can be controlled over USB or over IP. Pick one workflow below.
USB Control
In this workflow the camera connects over USB, either directly to the RCP or — for gimbal and REMI setups — to a RIO that relays control to the RCP over the network using a REMI tag.
Camera Configuration
Set the USB mode on the camera:
- Go to
MENU→Setup→USB→USB Connection Modeand select Remote Shooting (PC Remote).
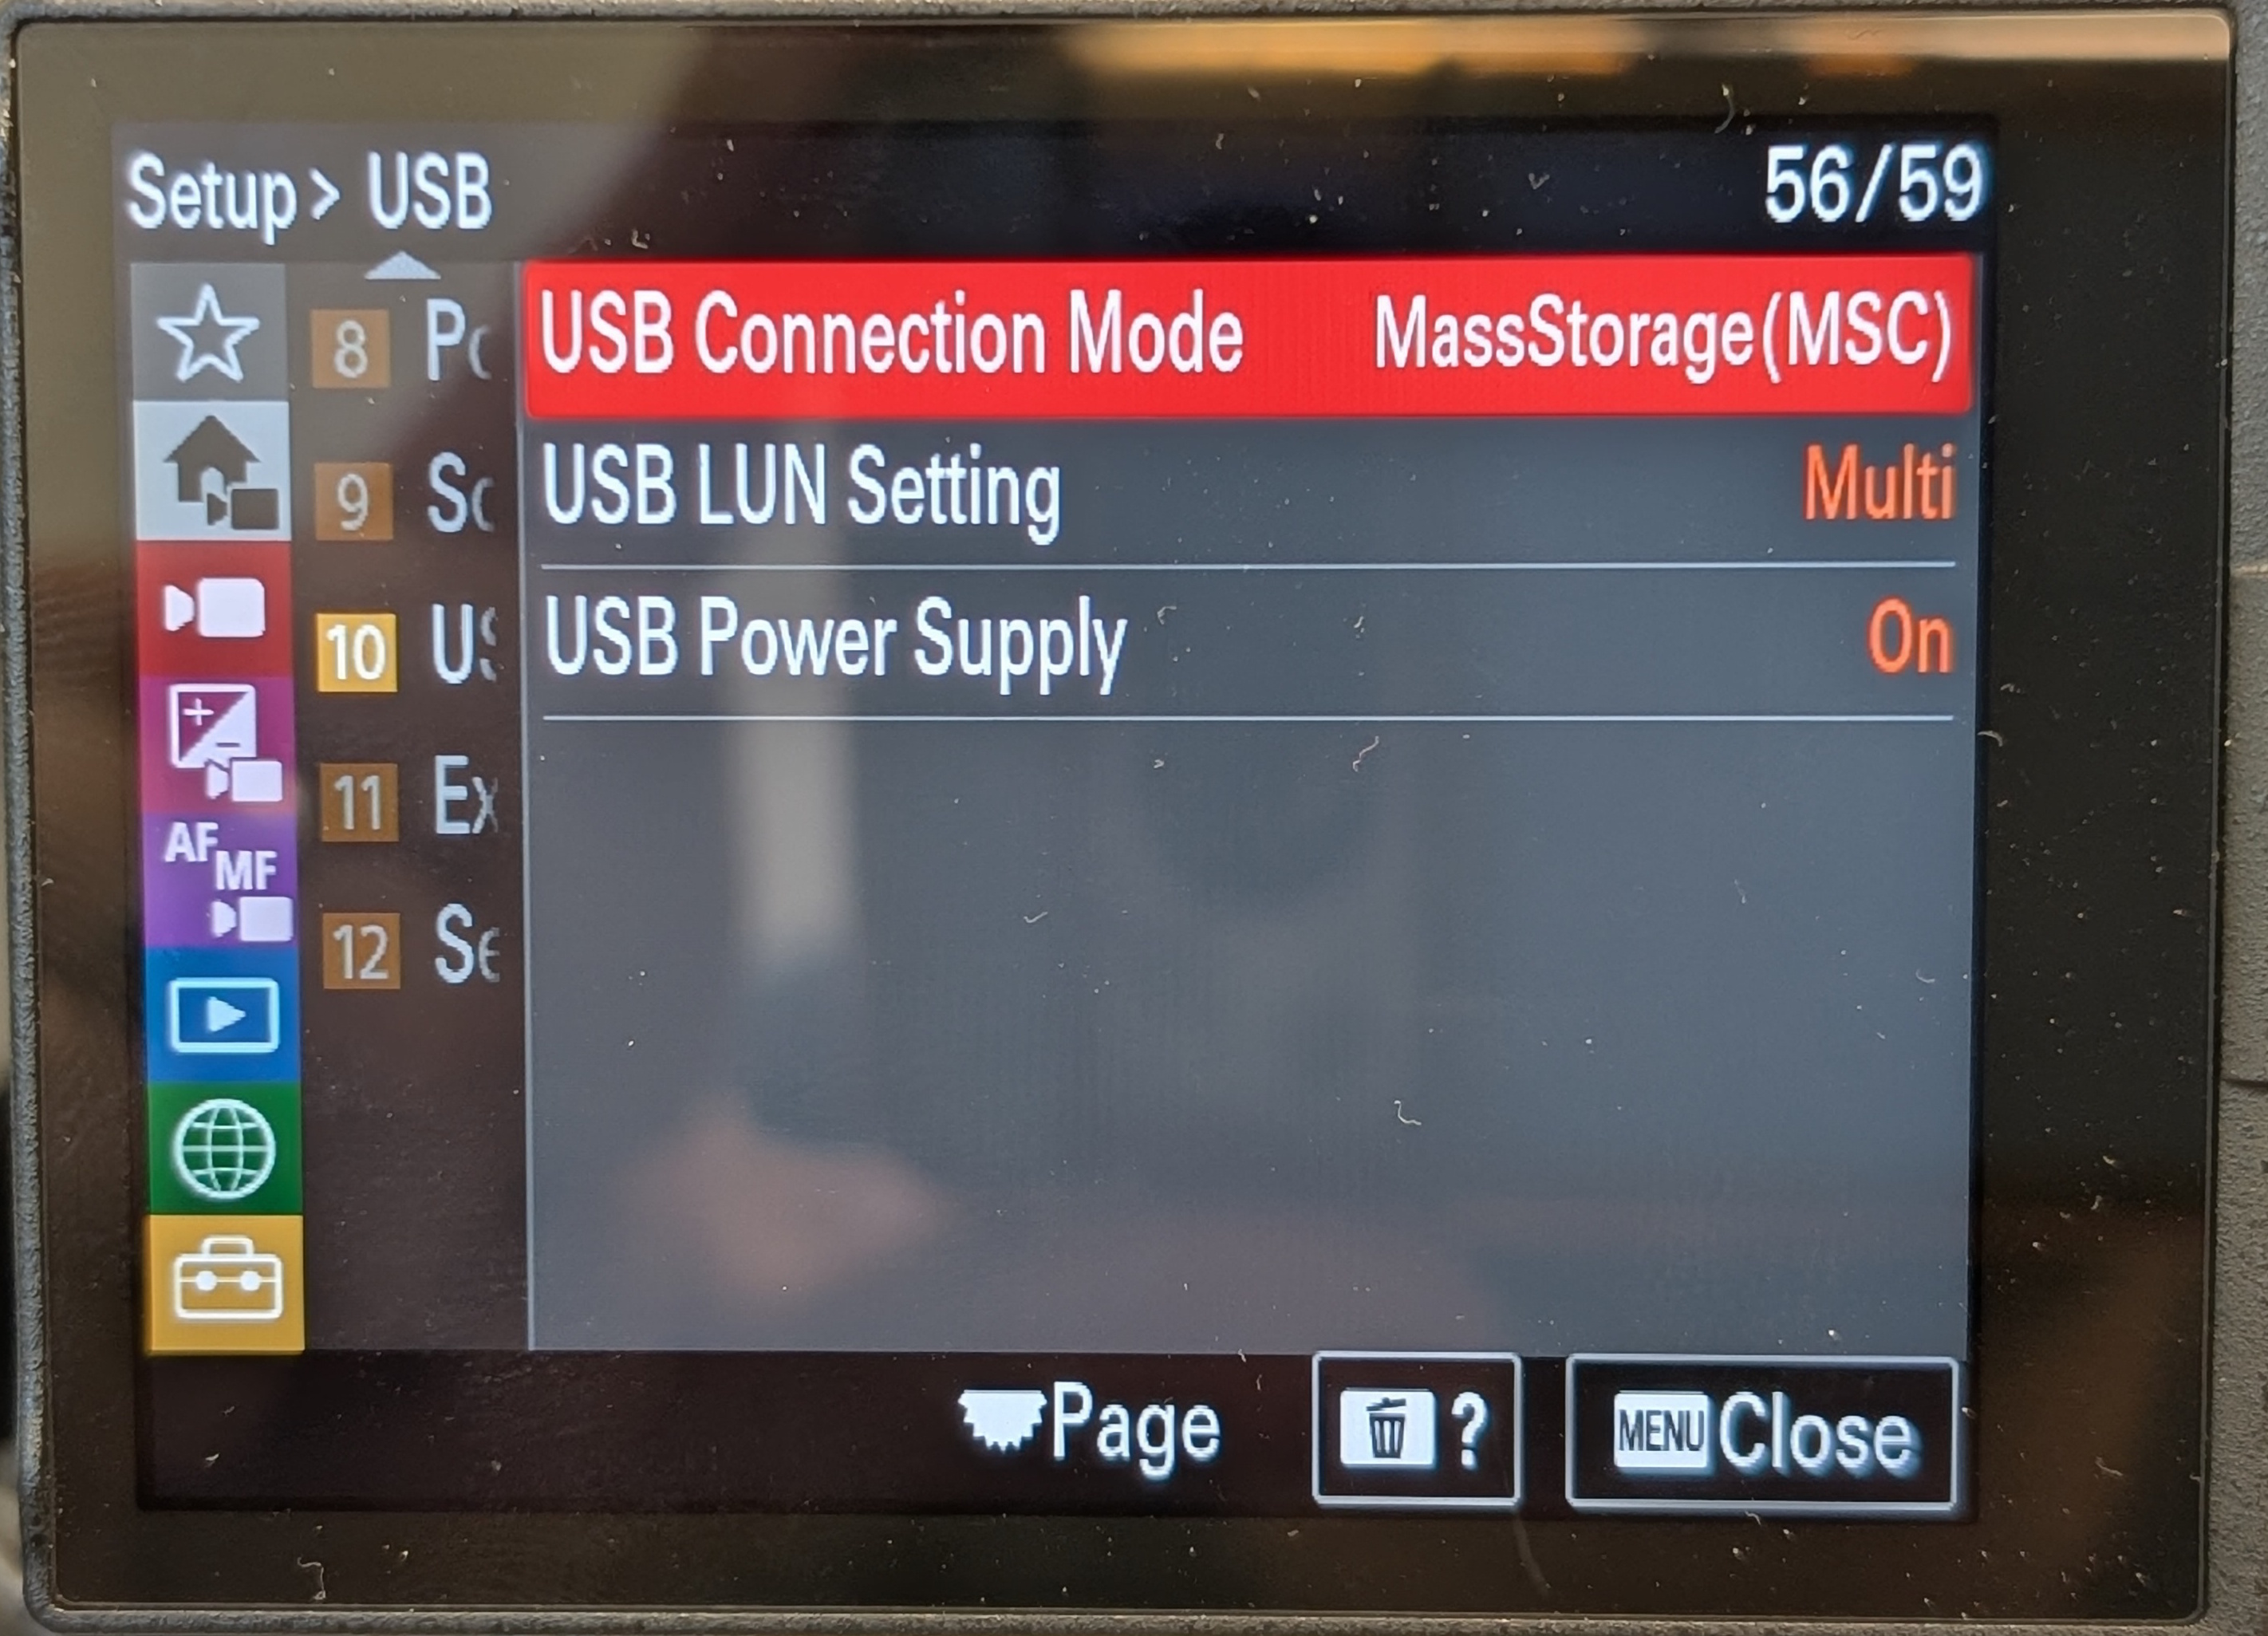
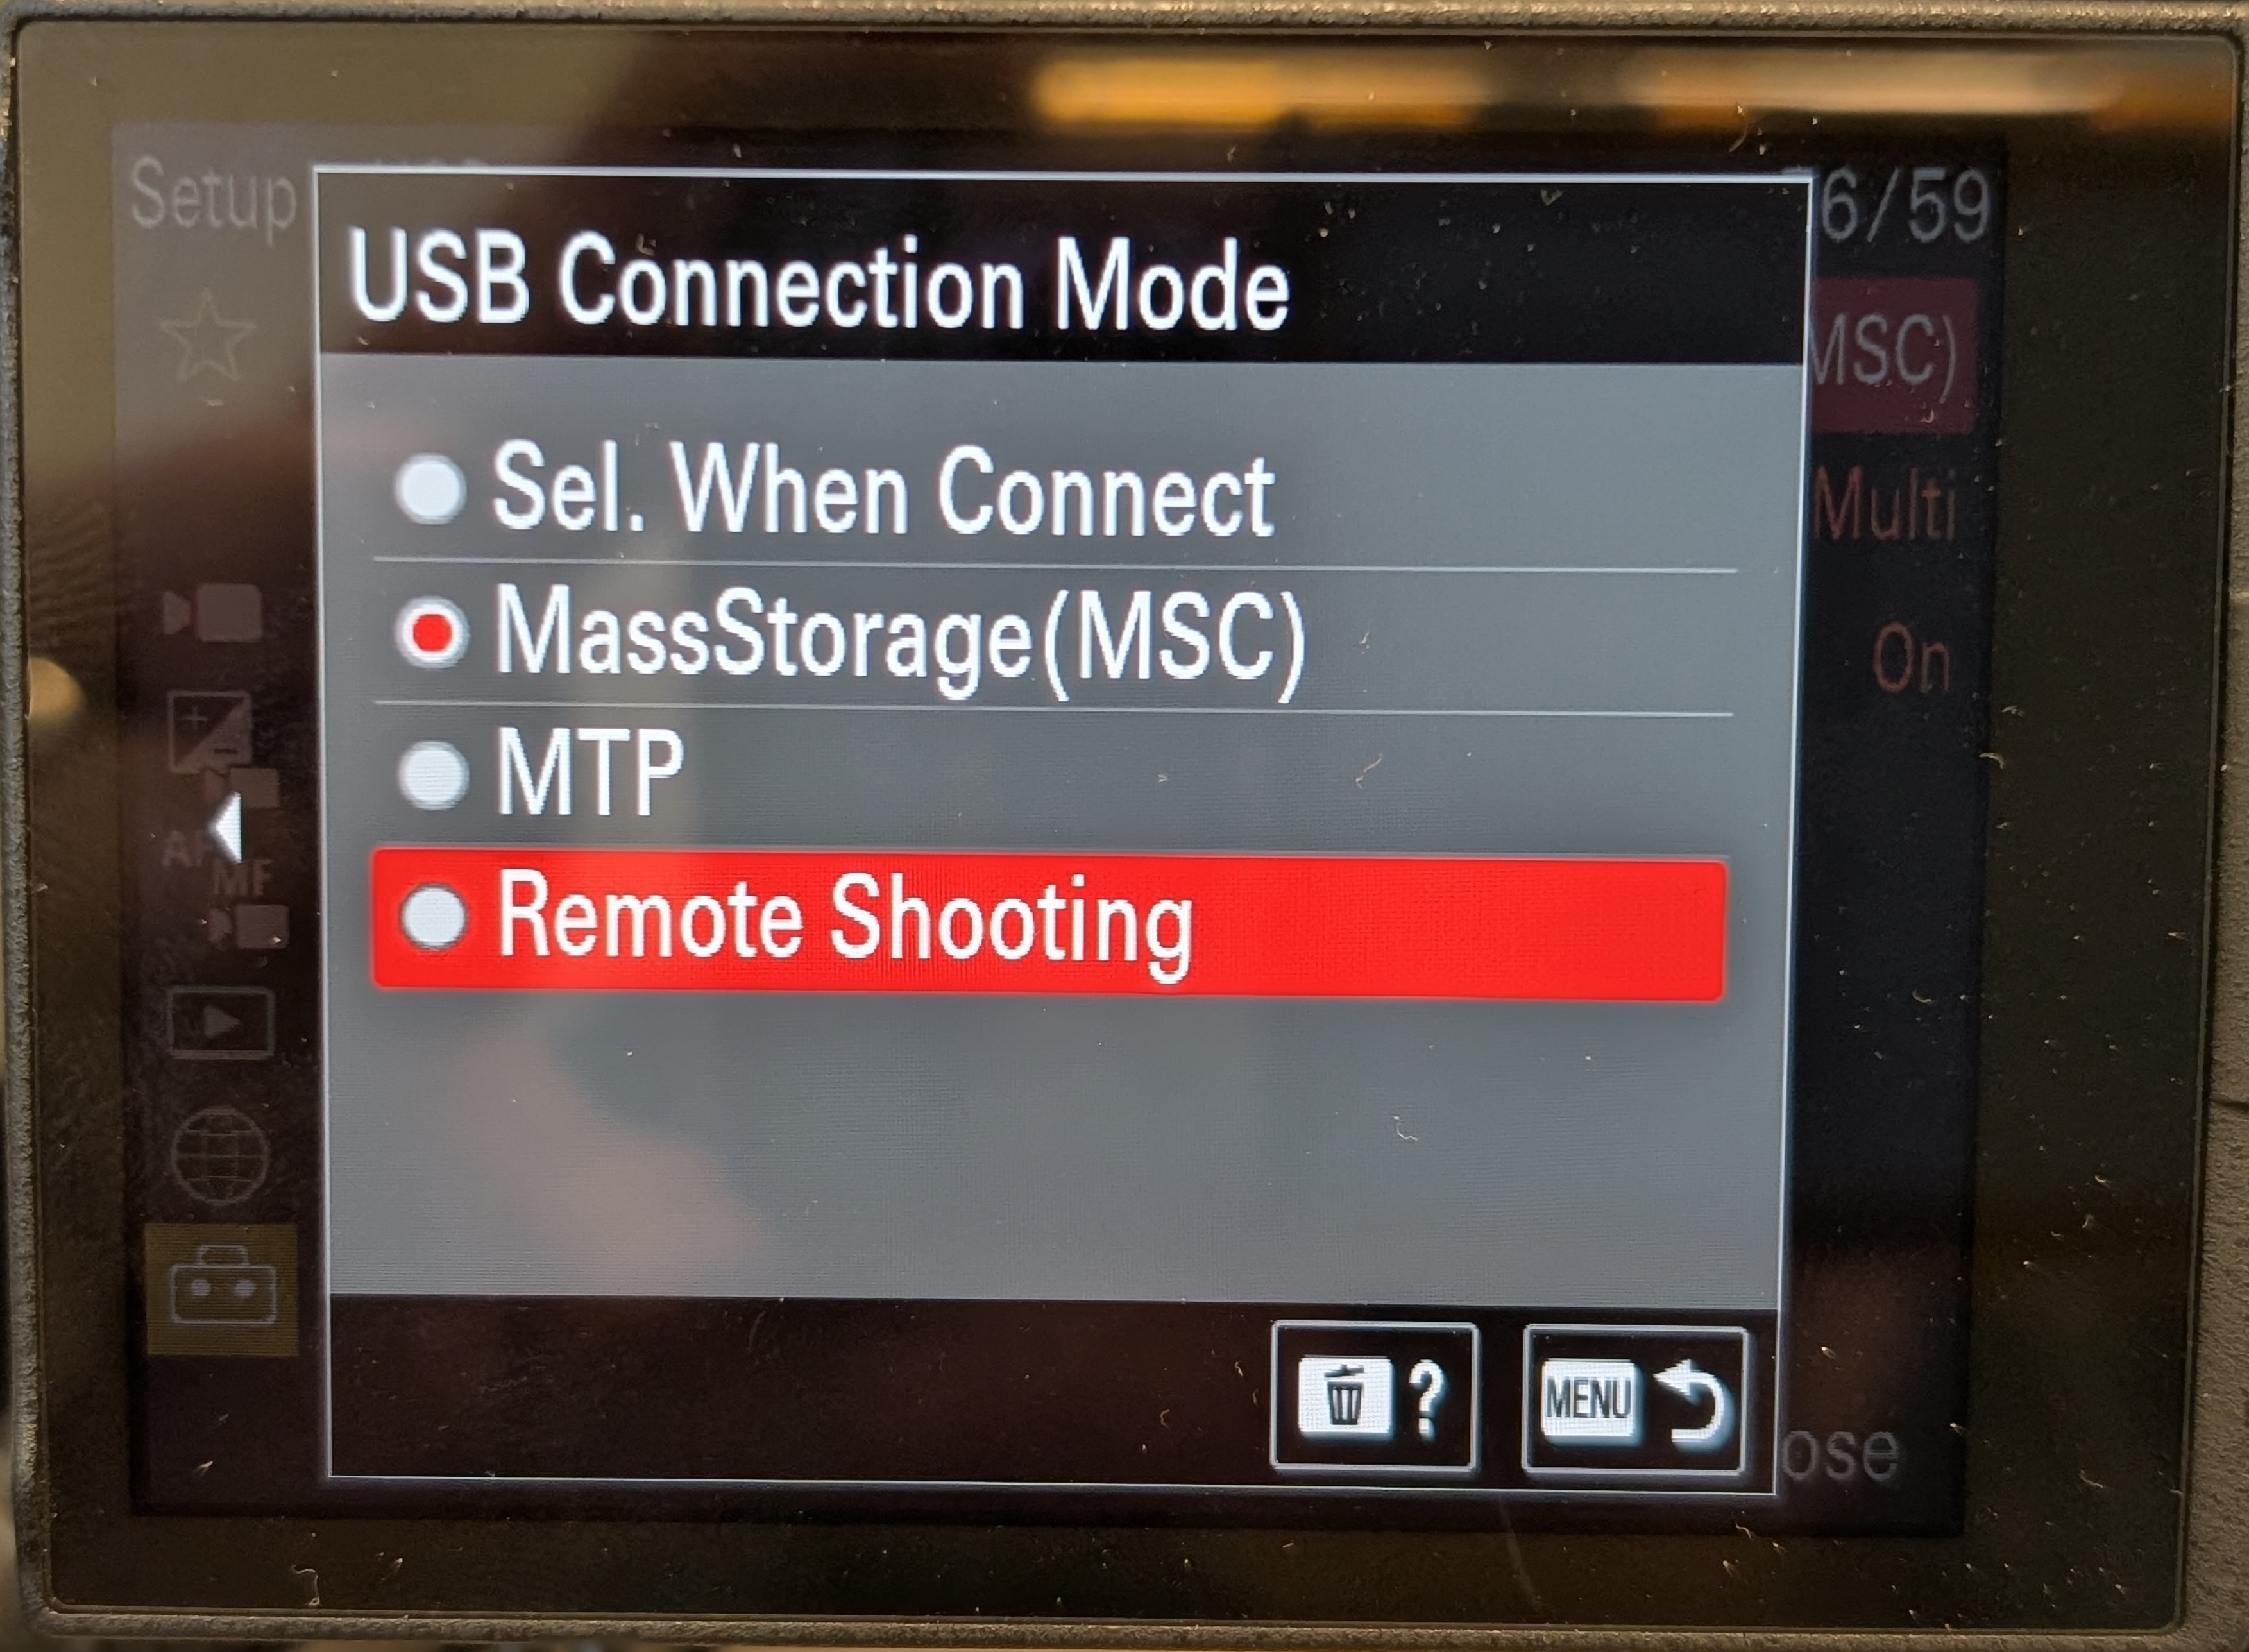
Some Alpha cameras display the USB function menu automatically when the cable is connected, but the FX3 needs the USB mode set manually. When the USB function menu does appear, select PC Remote Function.
Make sure the USB cable has data pins. Some cables are for charging only and carry no data.
RCP / RIO Configuration
-
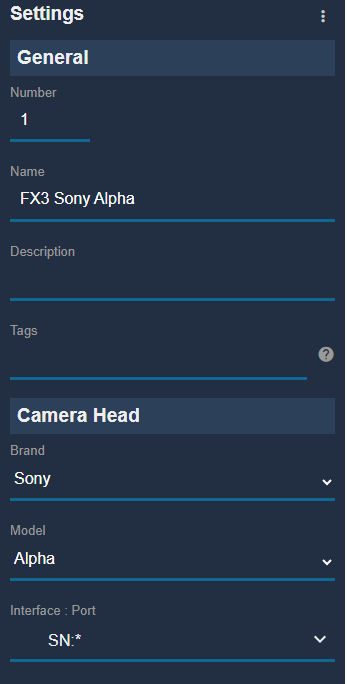
On a gimbal / REMI setup, the camera is controlled by the RIO over the USB cable. Configure the camera on the RIO, not on the RCP: browse to the RIO and add the FX3 camera there, then import the RIO onto the RCP using the REMI tag. Once the RIO is imported, you can control the FX3 from the RCP.
-
Direct to the RCP, add the camera as a USB/IP camera using brand Sony and model Alpha.
IP Control
In this workflow the camera connects to the network through a USB-to-Ethernet adapter and is controlled directly over IP from the RCP.
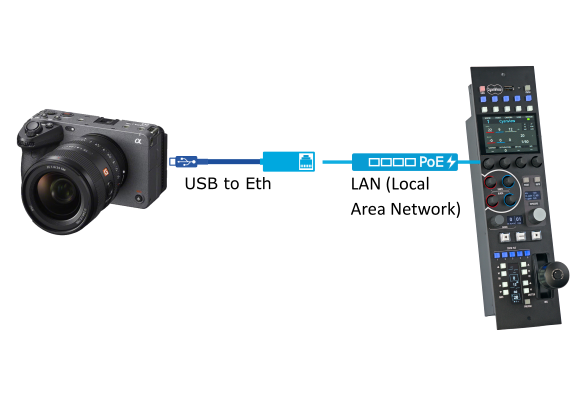
Camera Configuration
Step 1 — Configure the LAN
-
Go to
MENU→Network→Wired LAN→IP Addressand configure the address (DHCP or Static).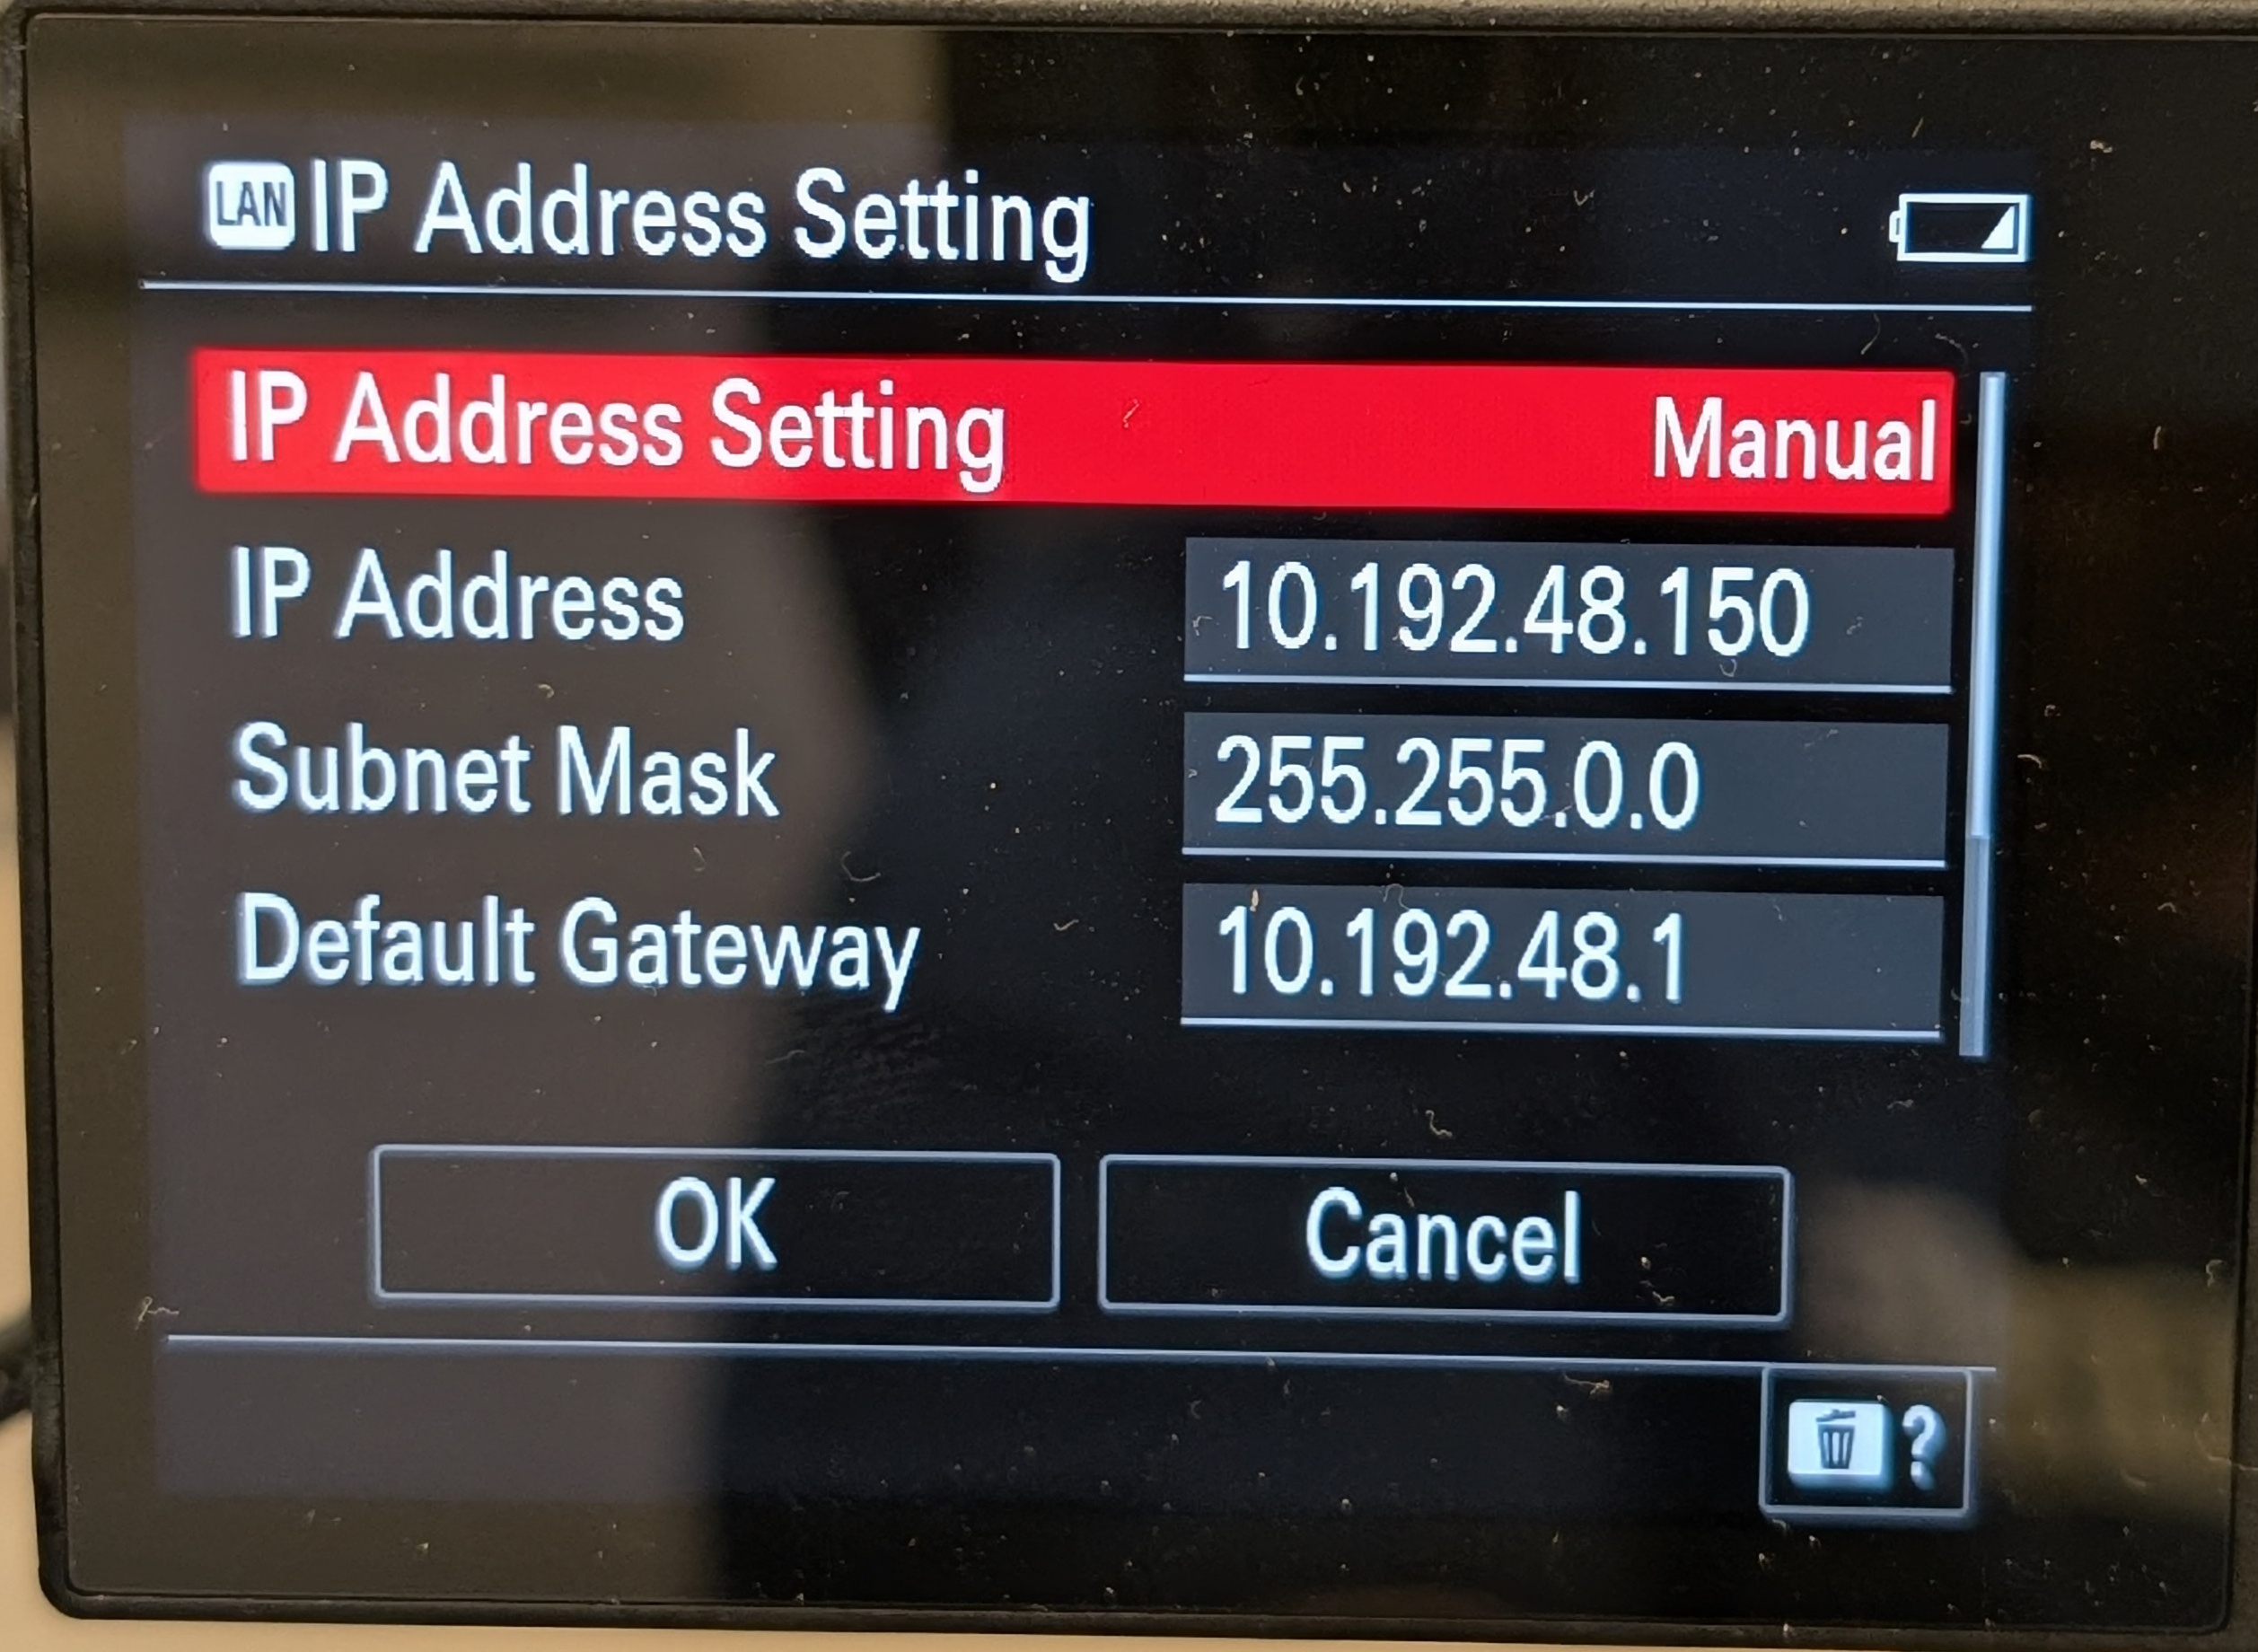
-
Check the IP address info tab to confirm the settings.
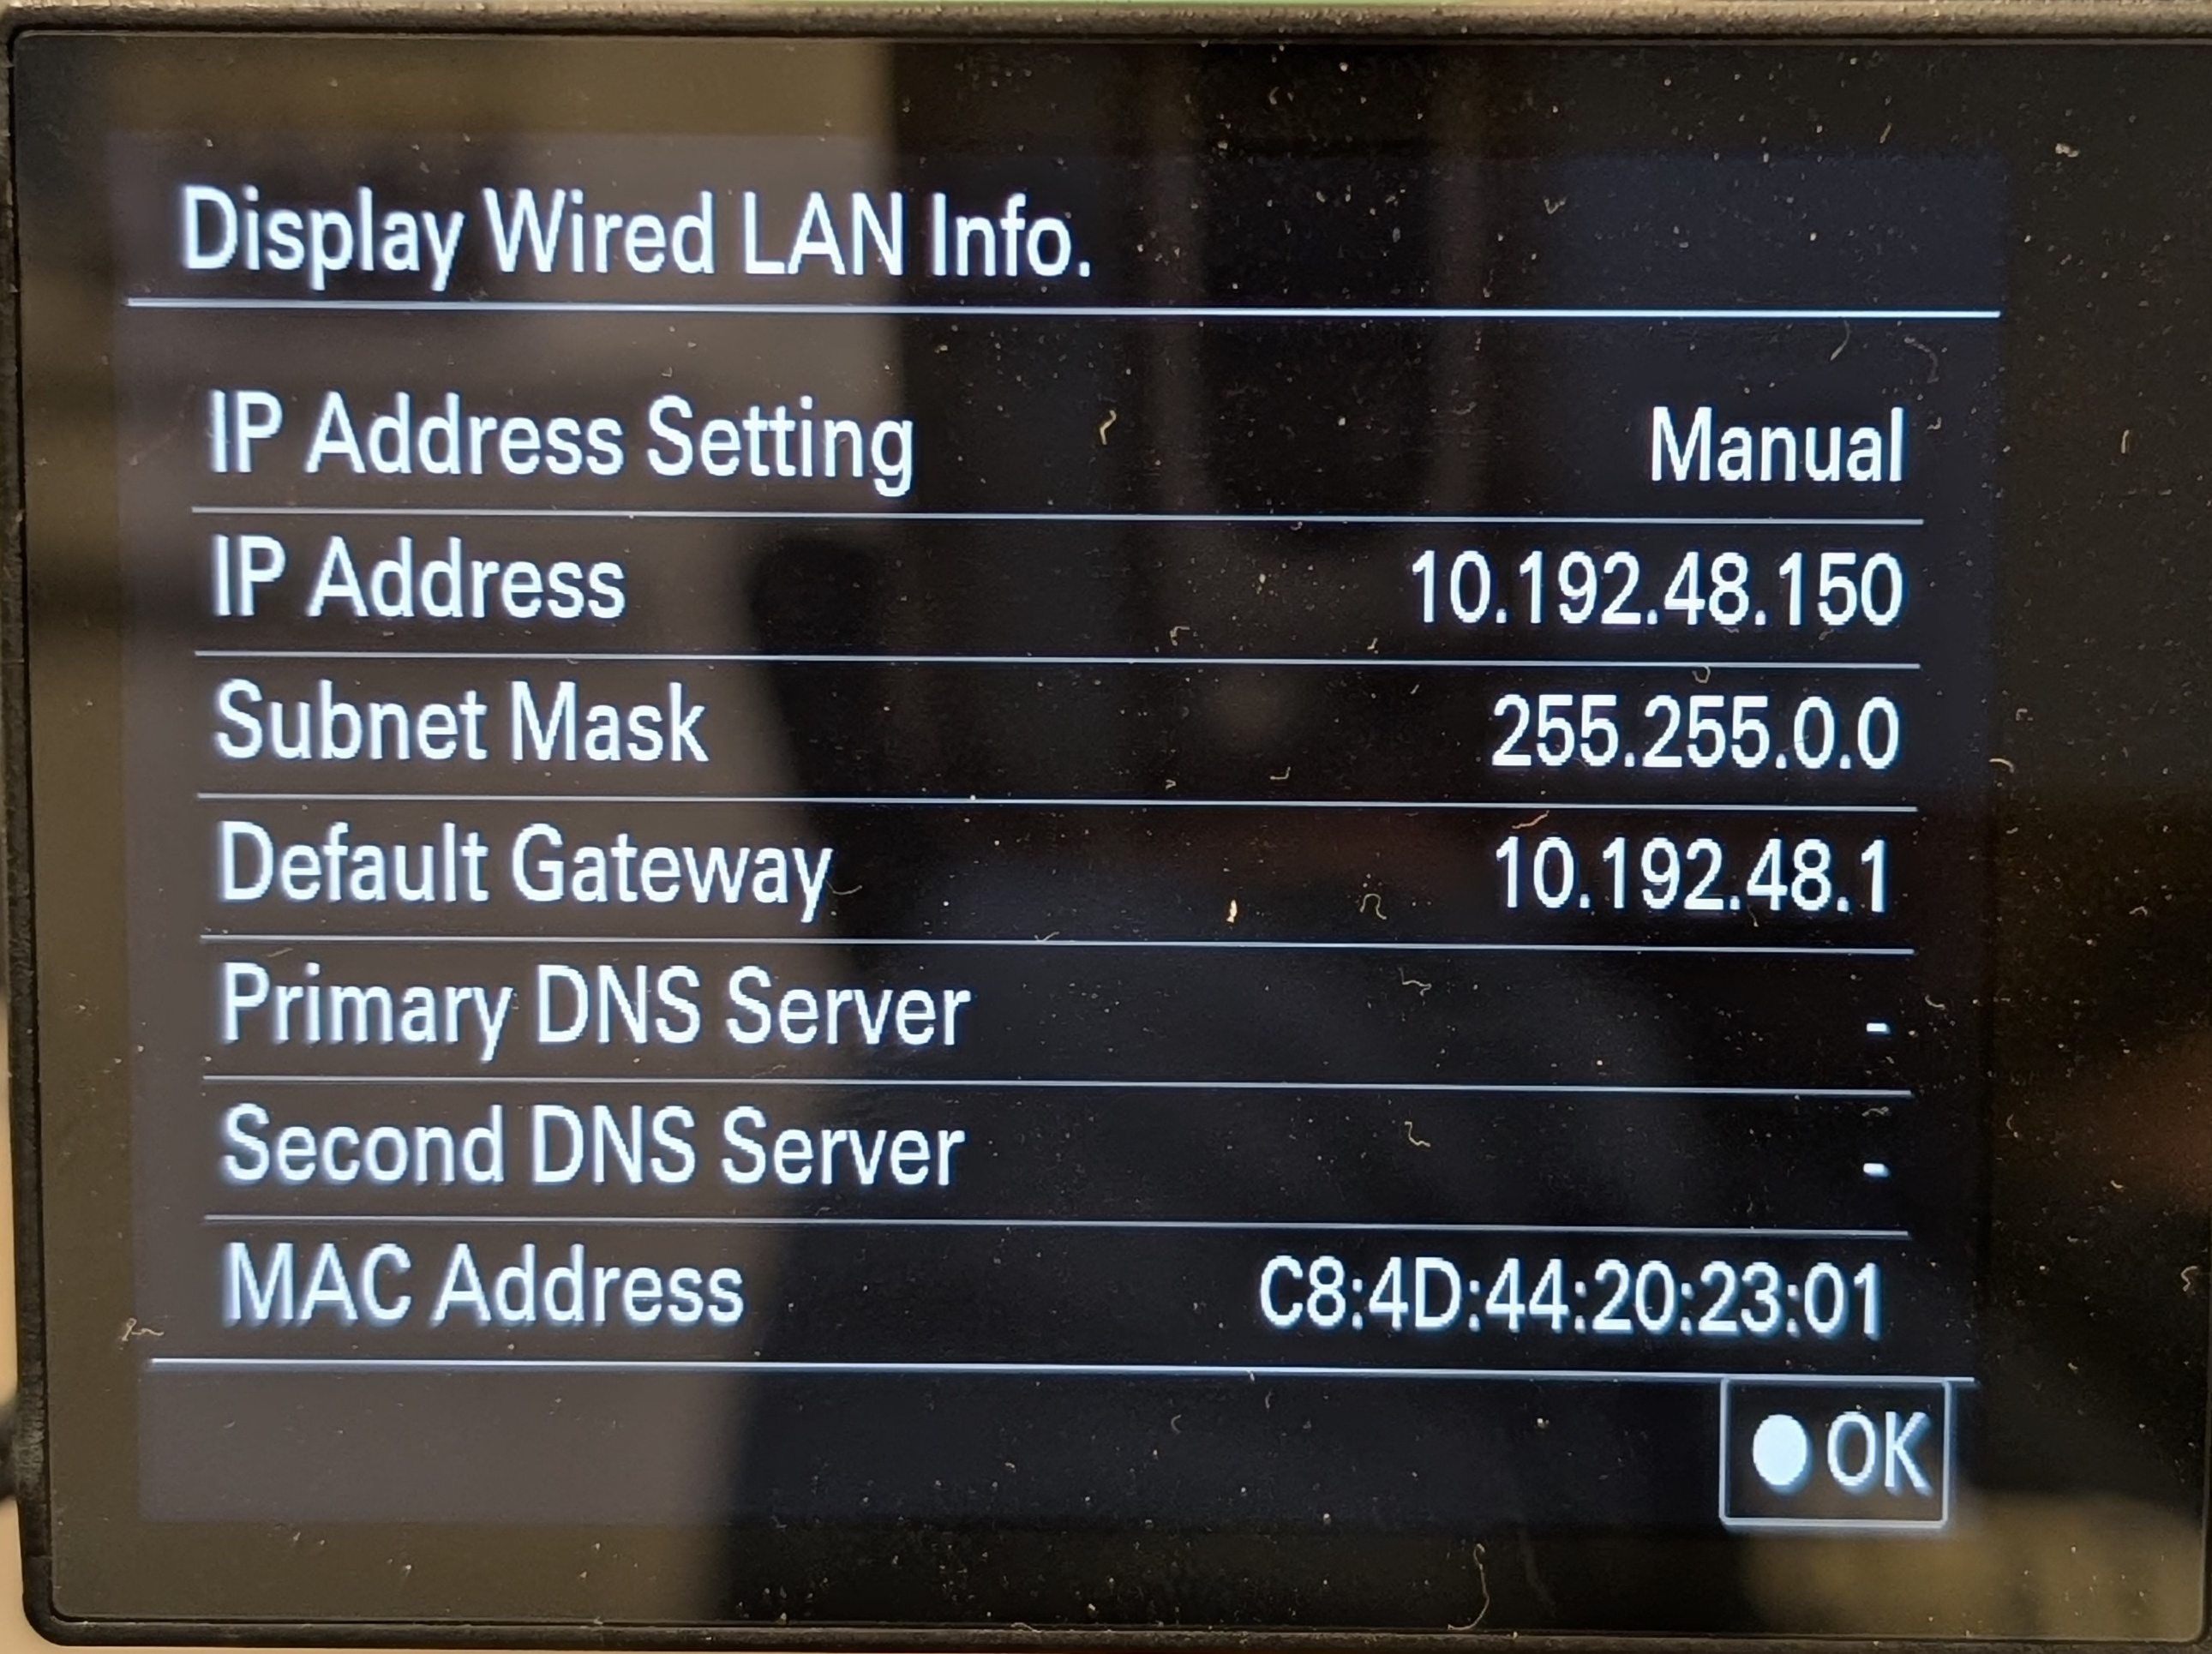 danger
If you have configured this information and nothing appears, the USB-to-Ethernet dongle is not compatible (see adapter compatibility).
Step 2 — Activate USB-LAN tethering
-
Go to
MENU→Network→USB-LAN Tethering→USB-LAN Connectionand activate it.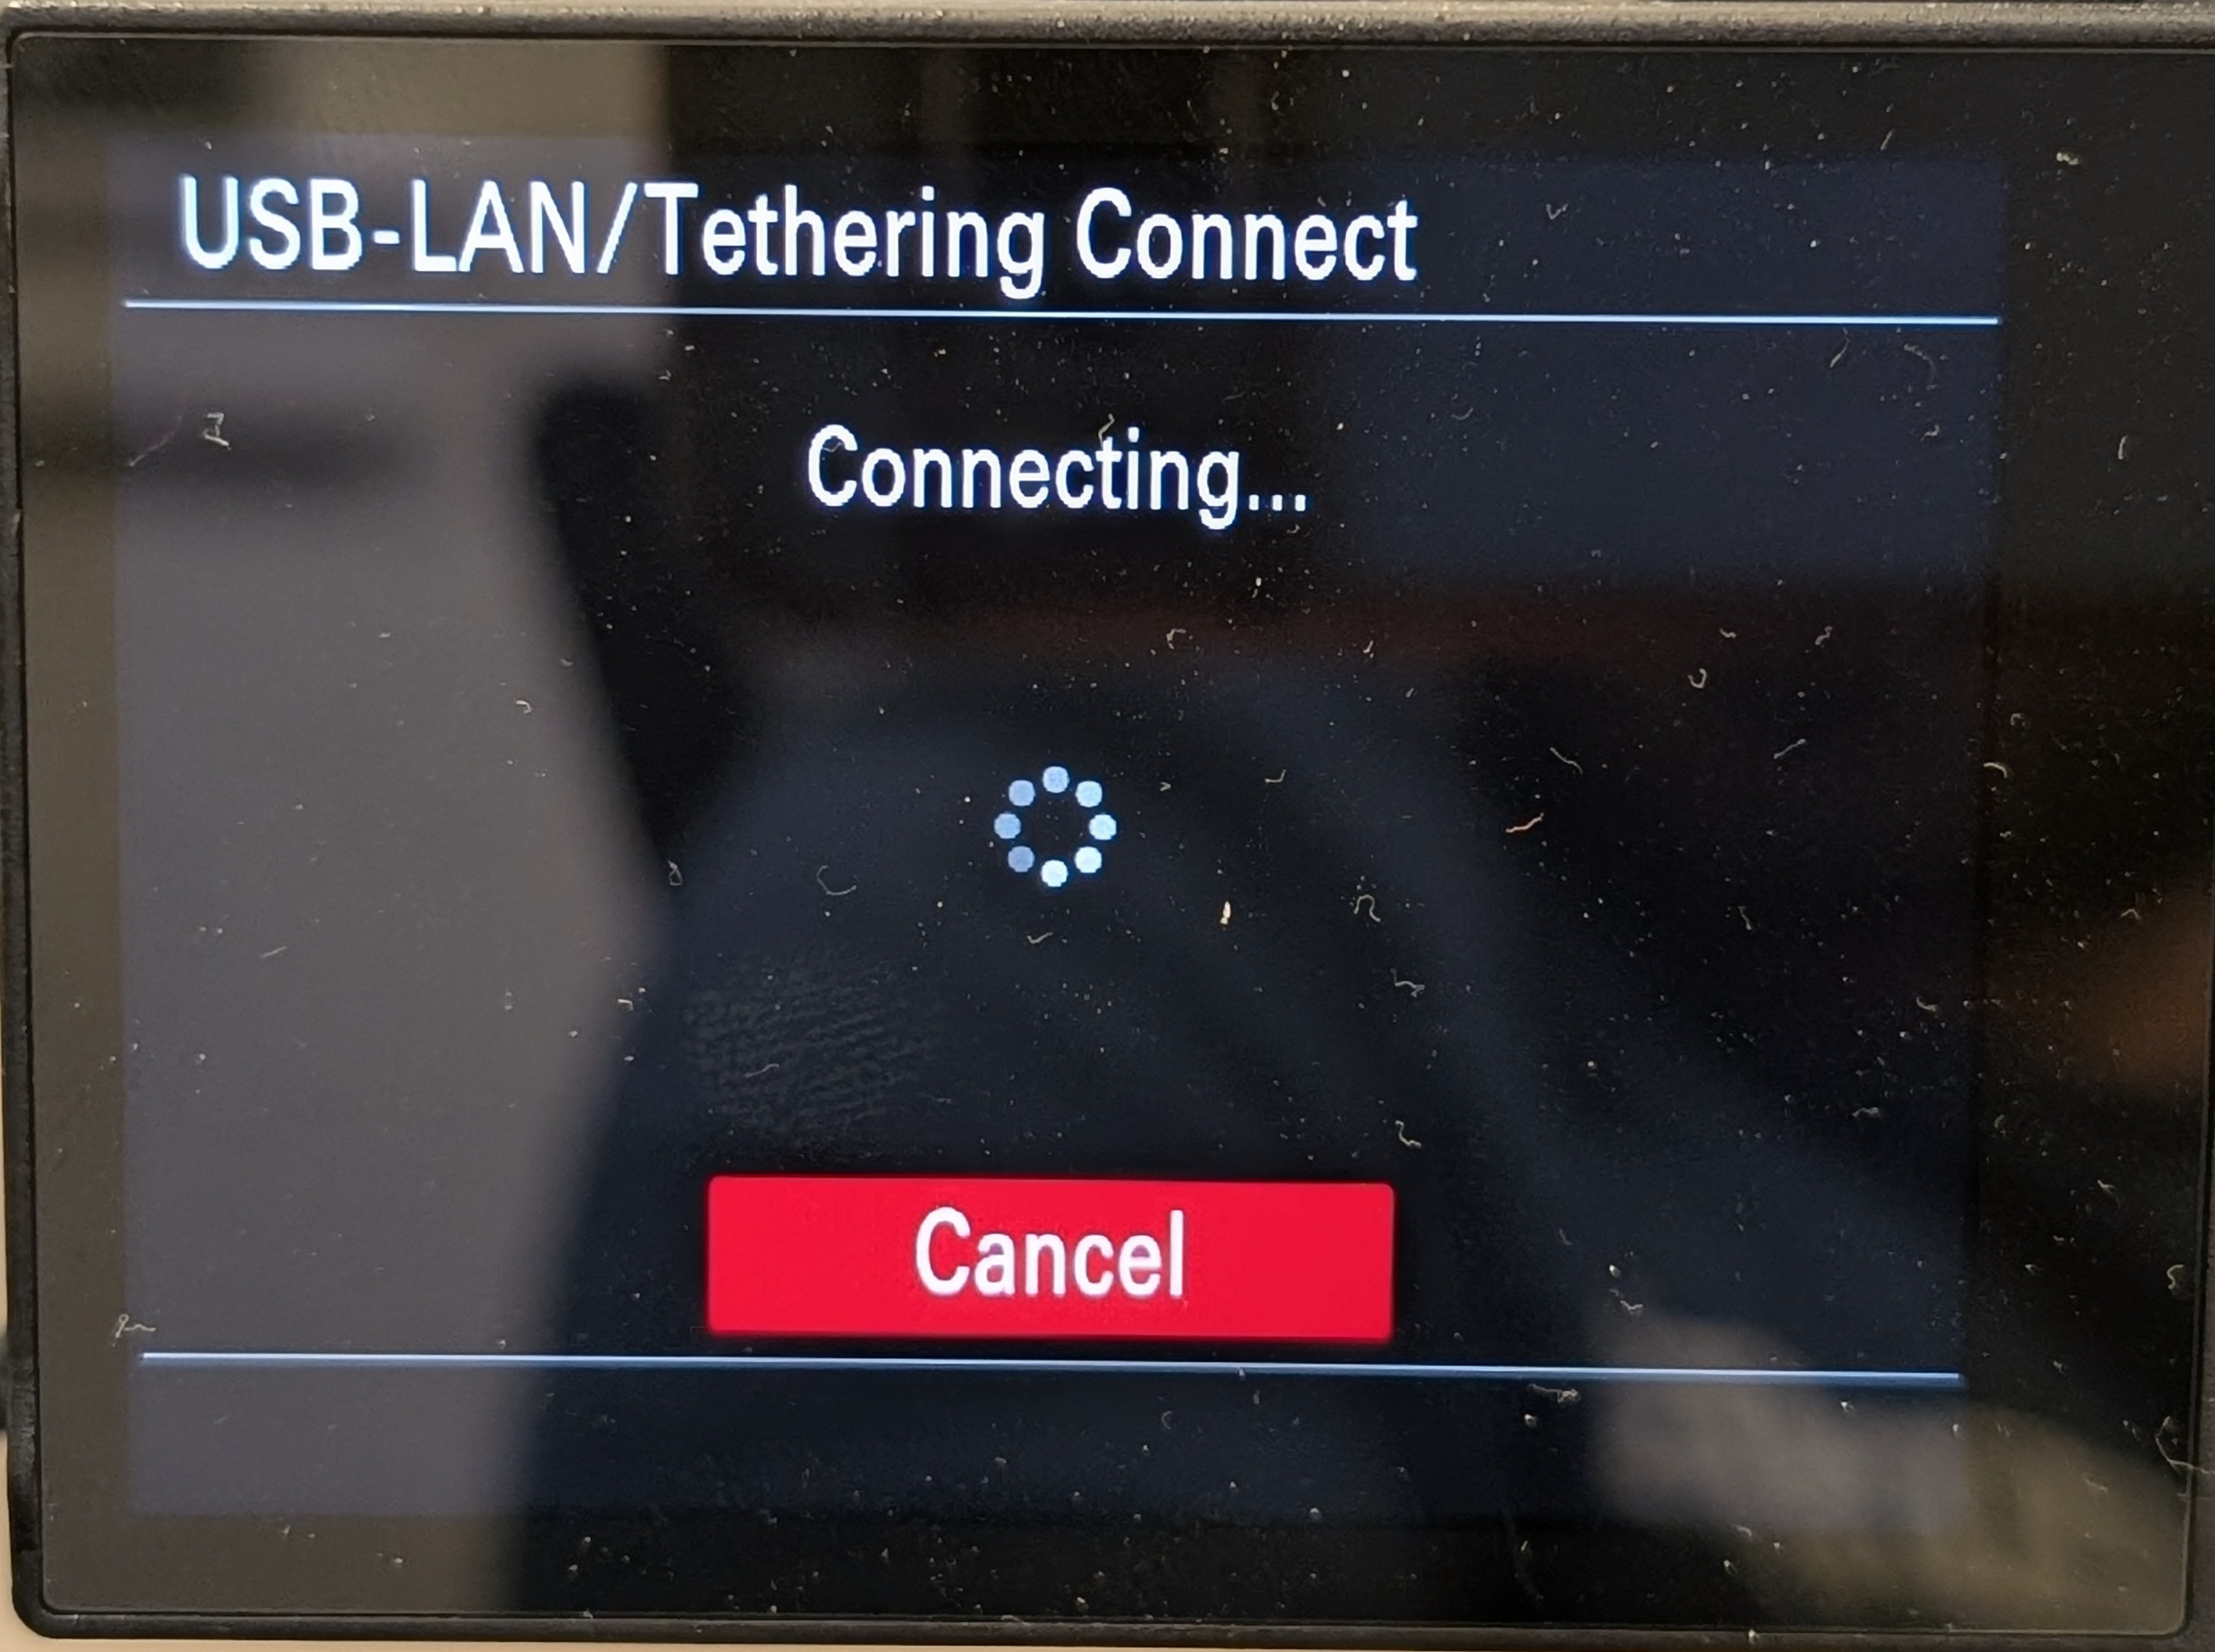
-
In the same menu, set
USB-LAN Cnct Launchto On.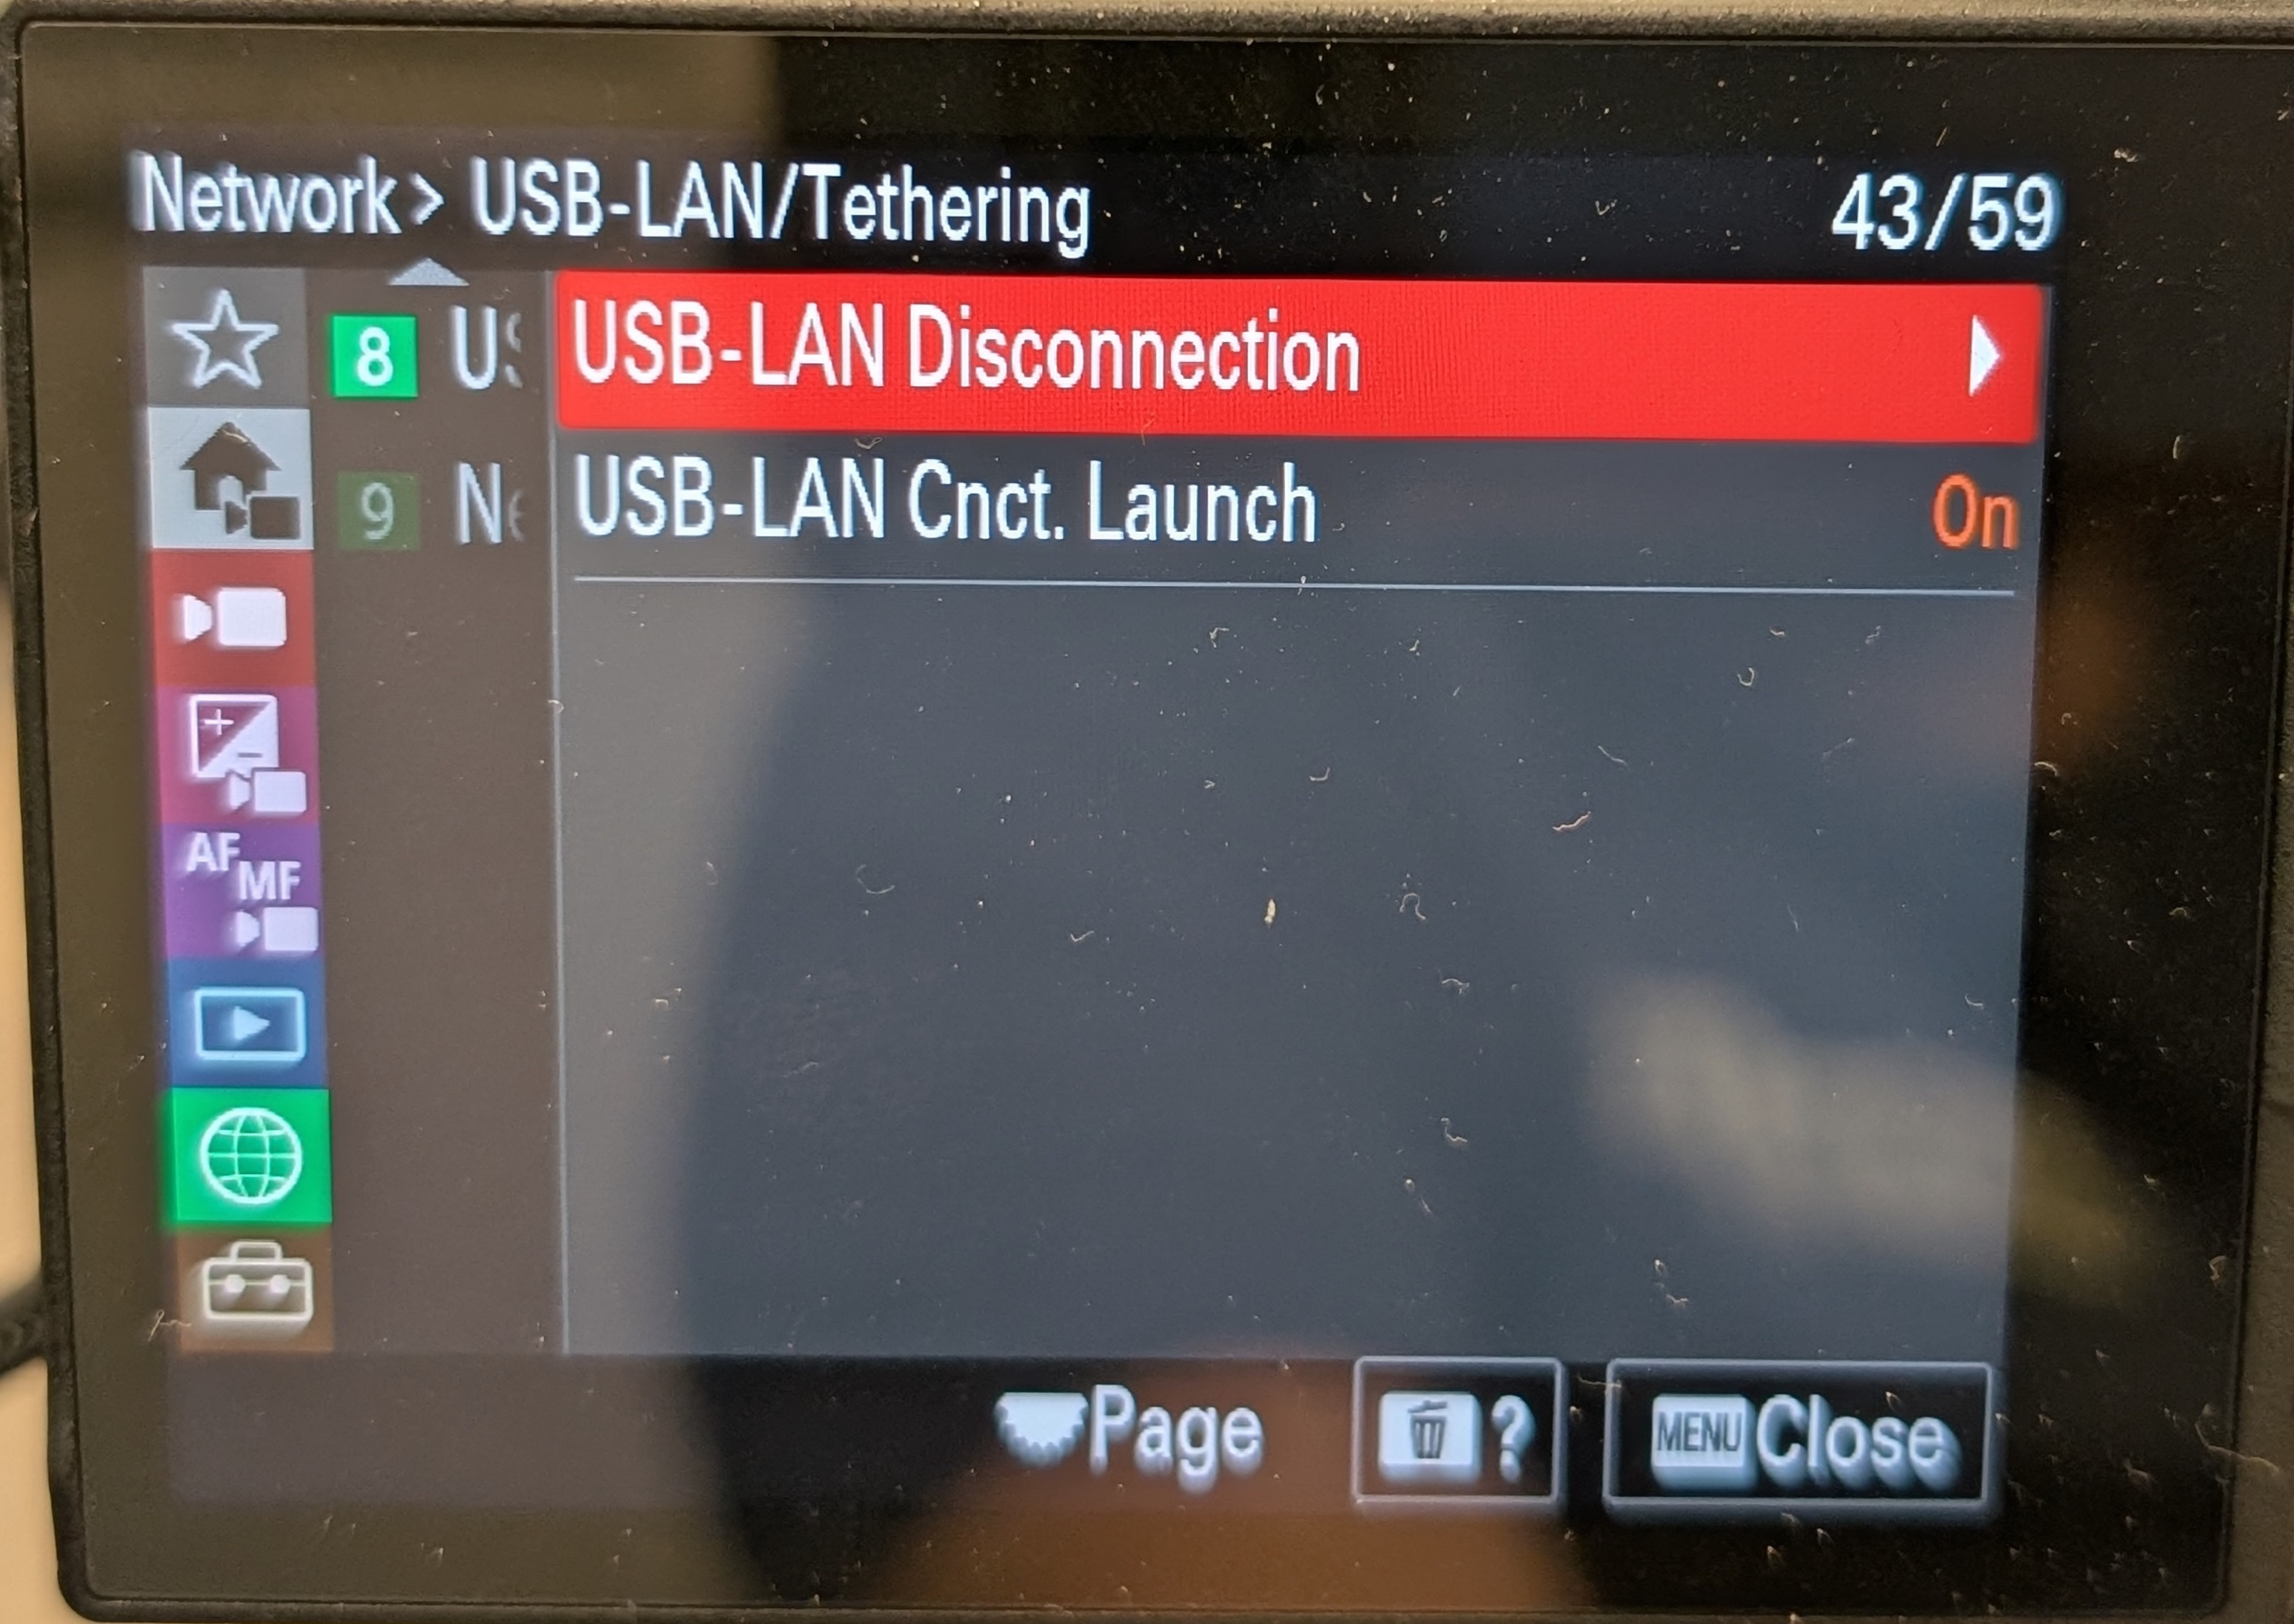
Step 3 — Configure Remote Shooting
-
Set
MENU→Network→Cnct./Remote Sht→Remote Shoot Function→Remote Shootingto Off.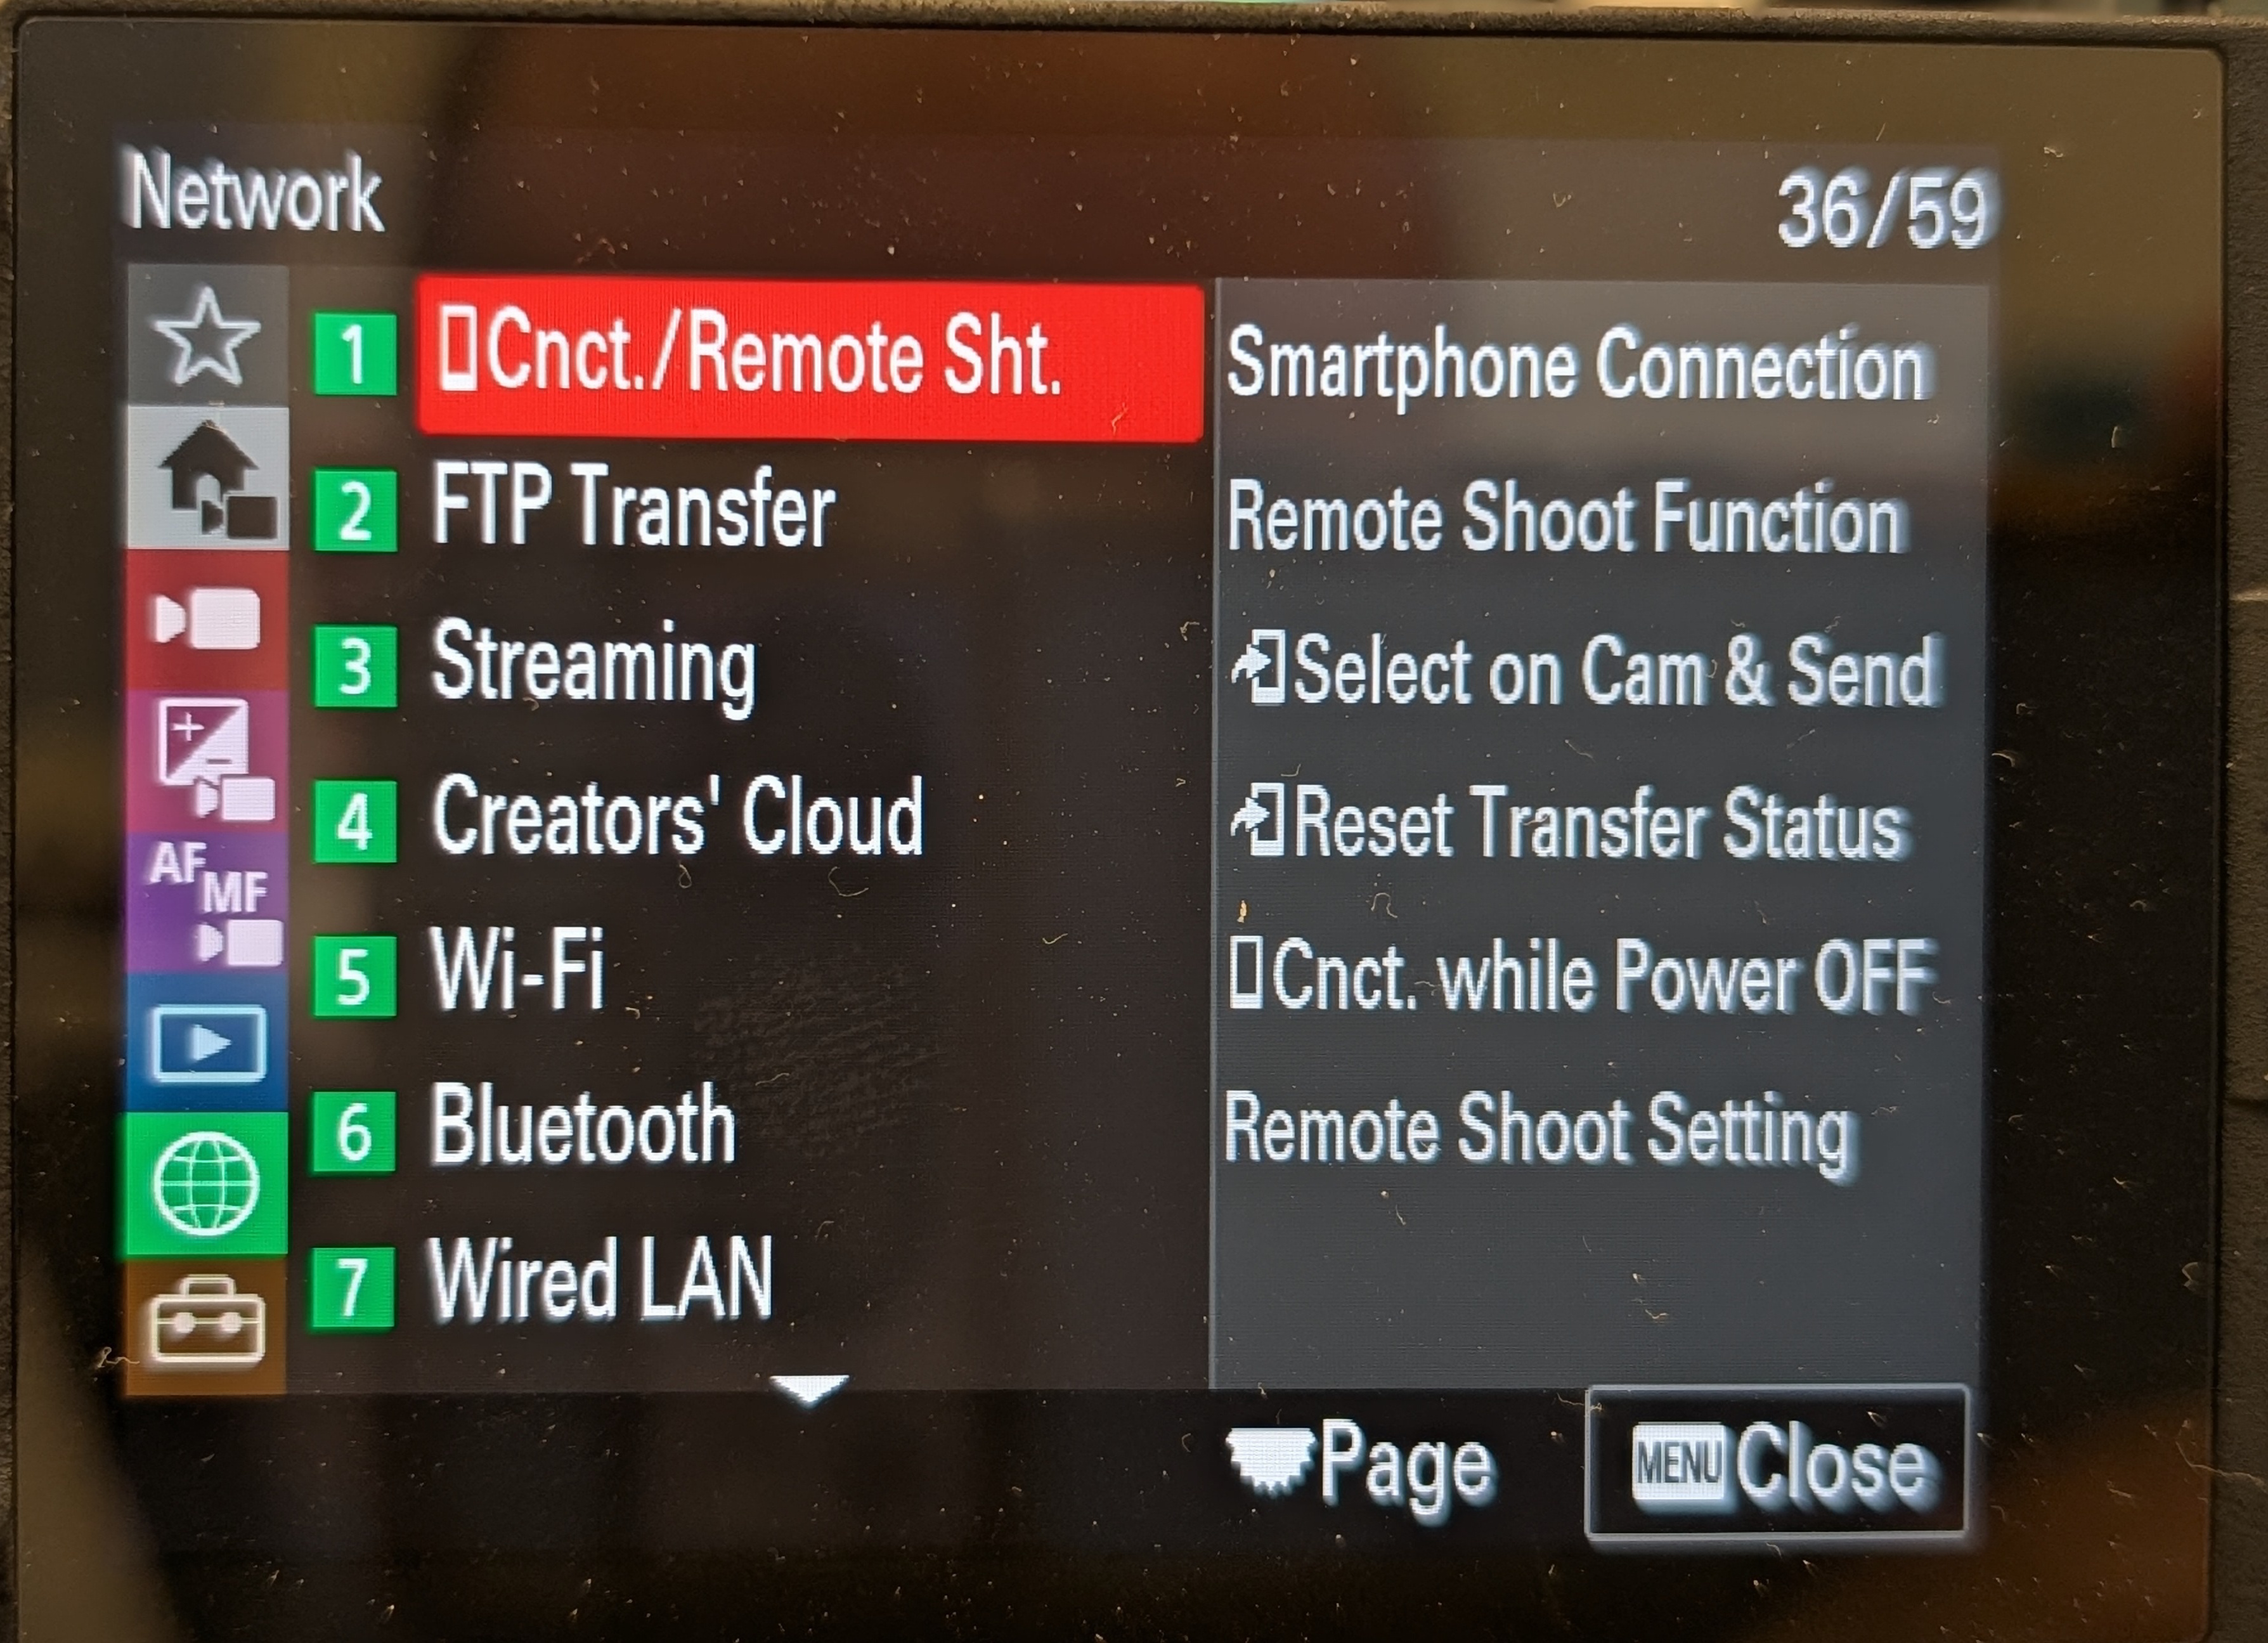
-
Set
MENU→Network→Network Option→Access Authen Settingsto Off.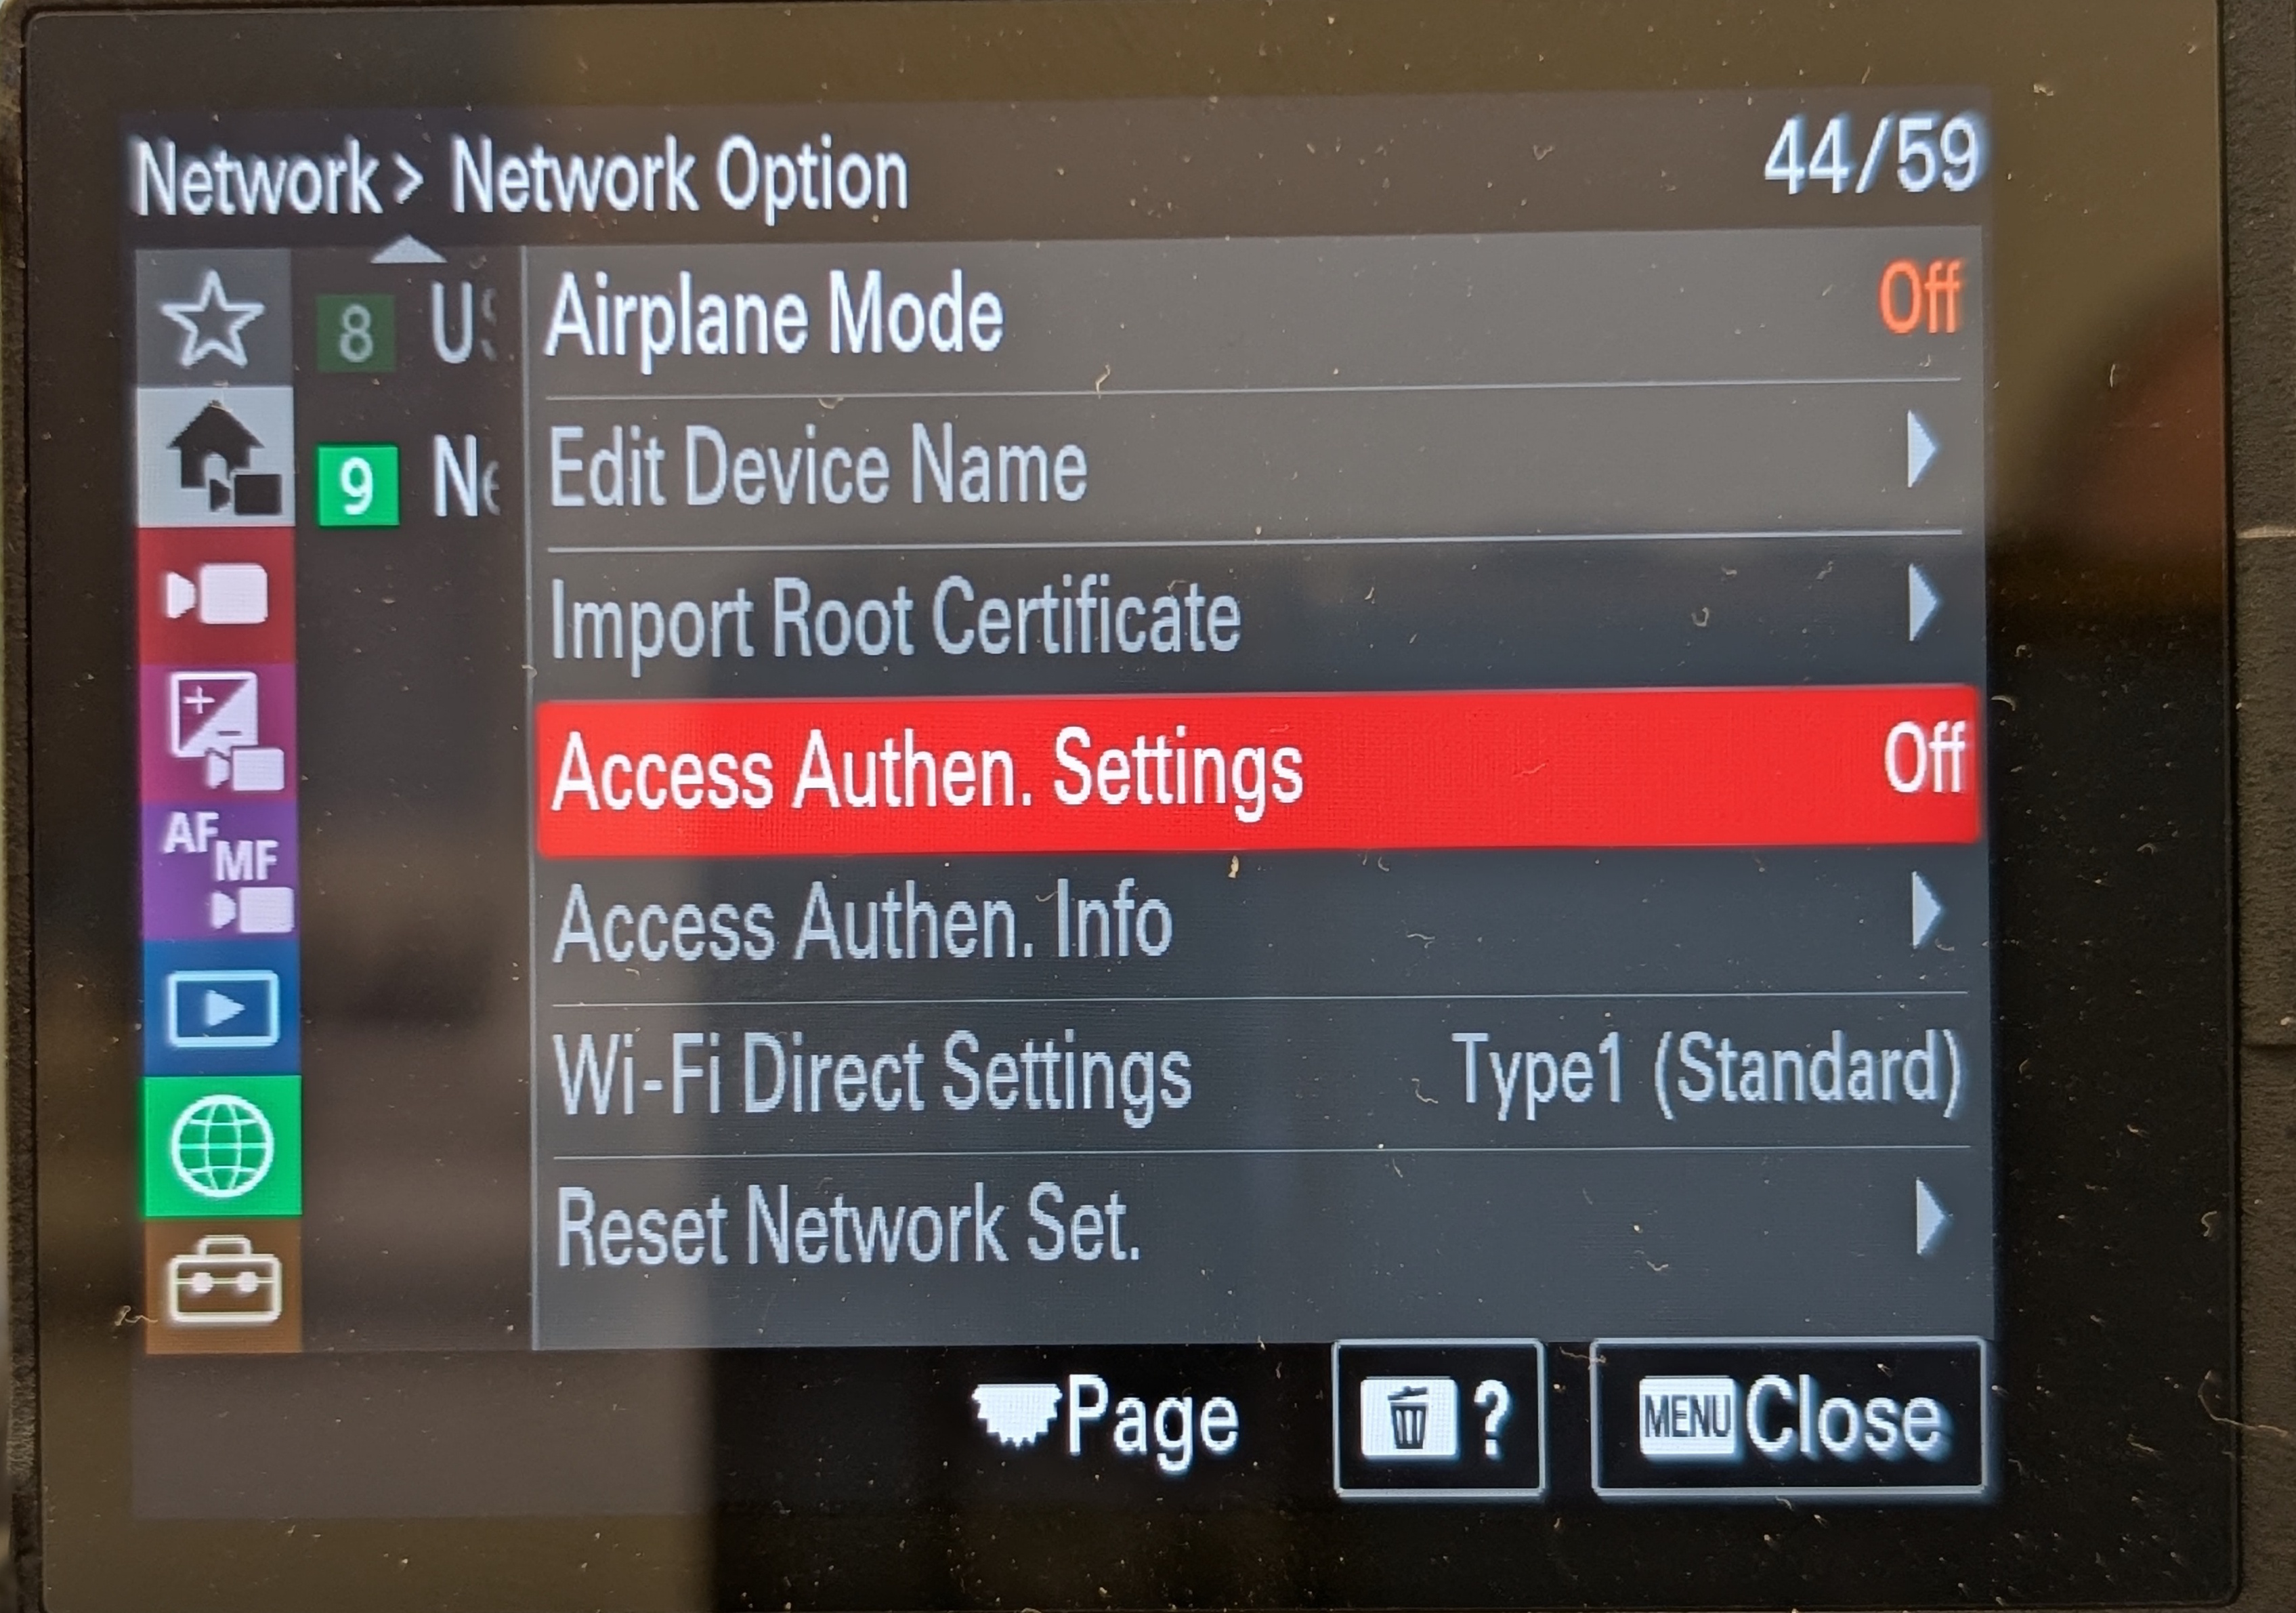
-
Set
MENU→Network→Cnct./Remote Sht→Remote Shoot Function→Remote Shootingback to On.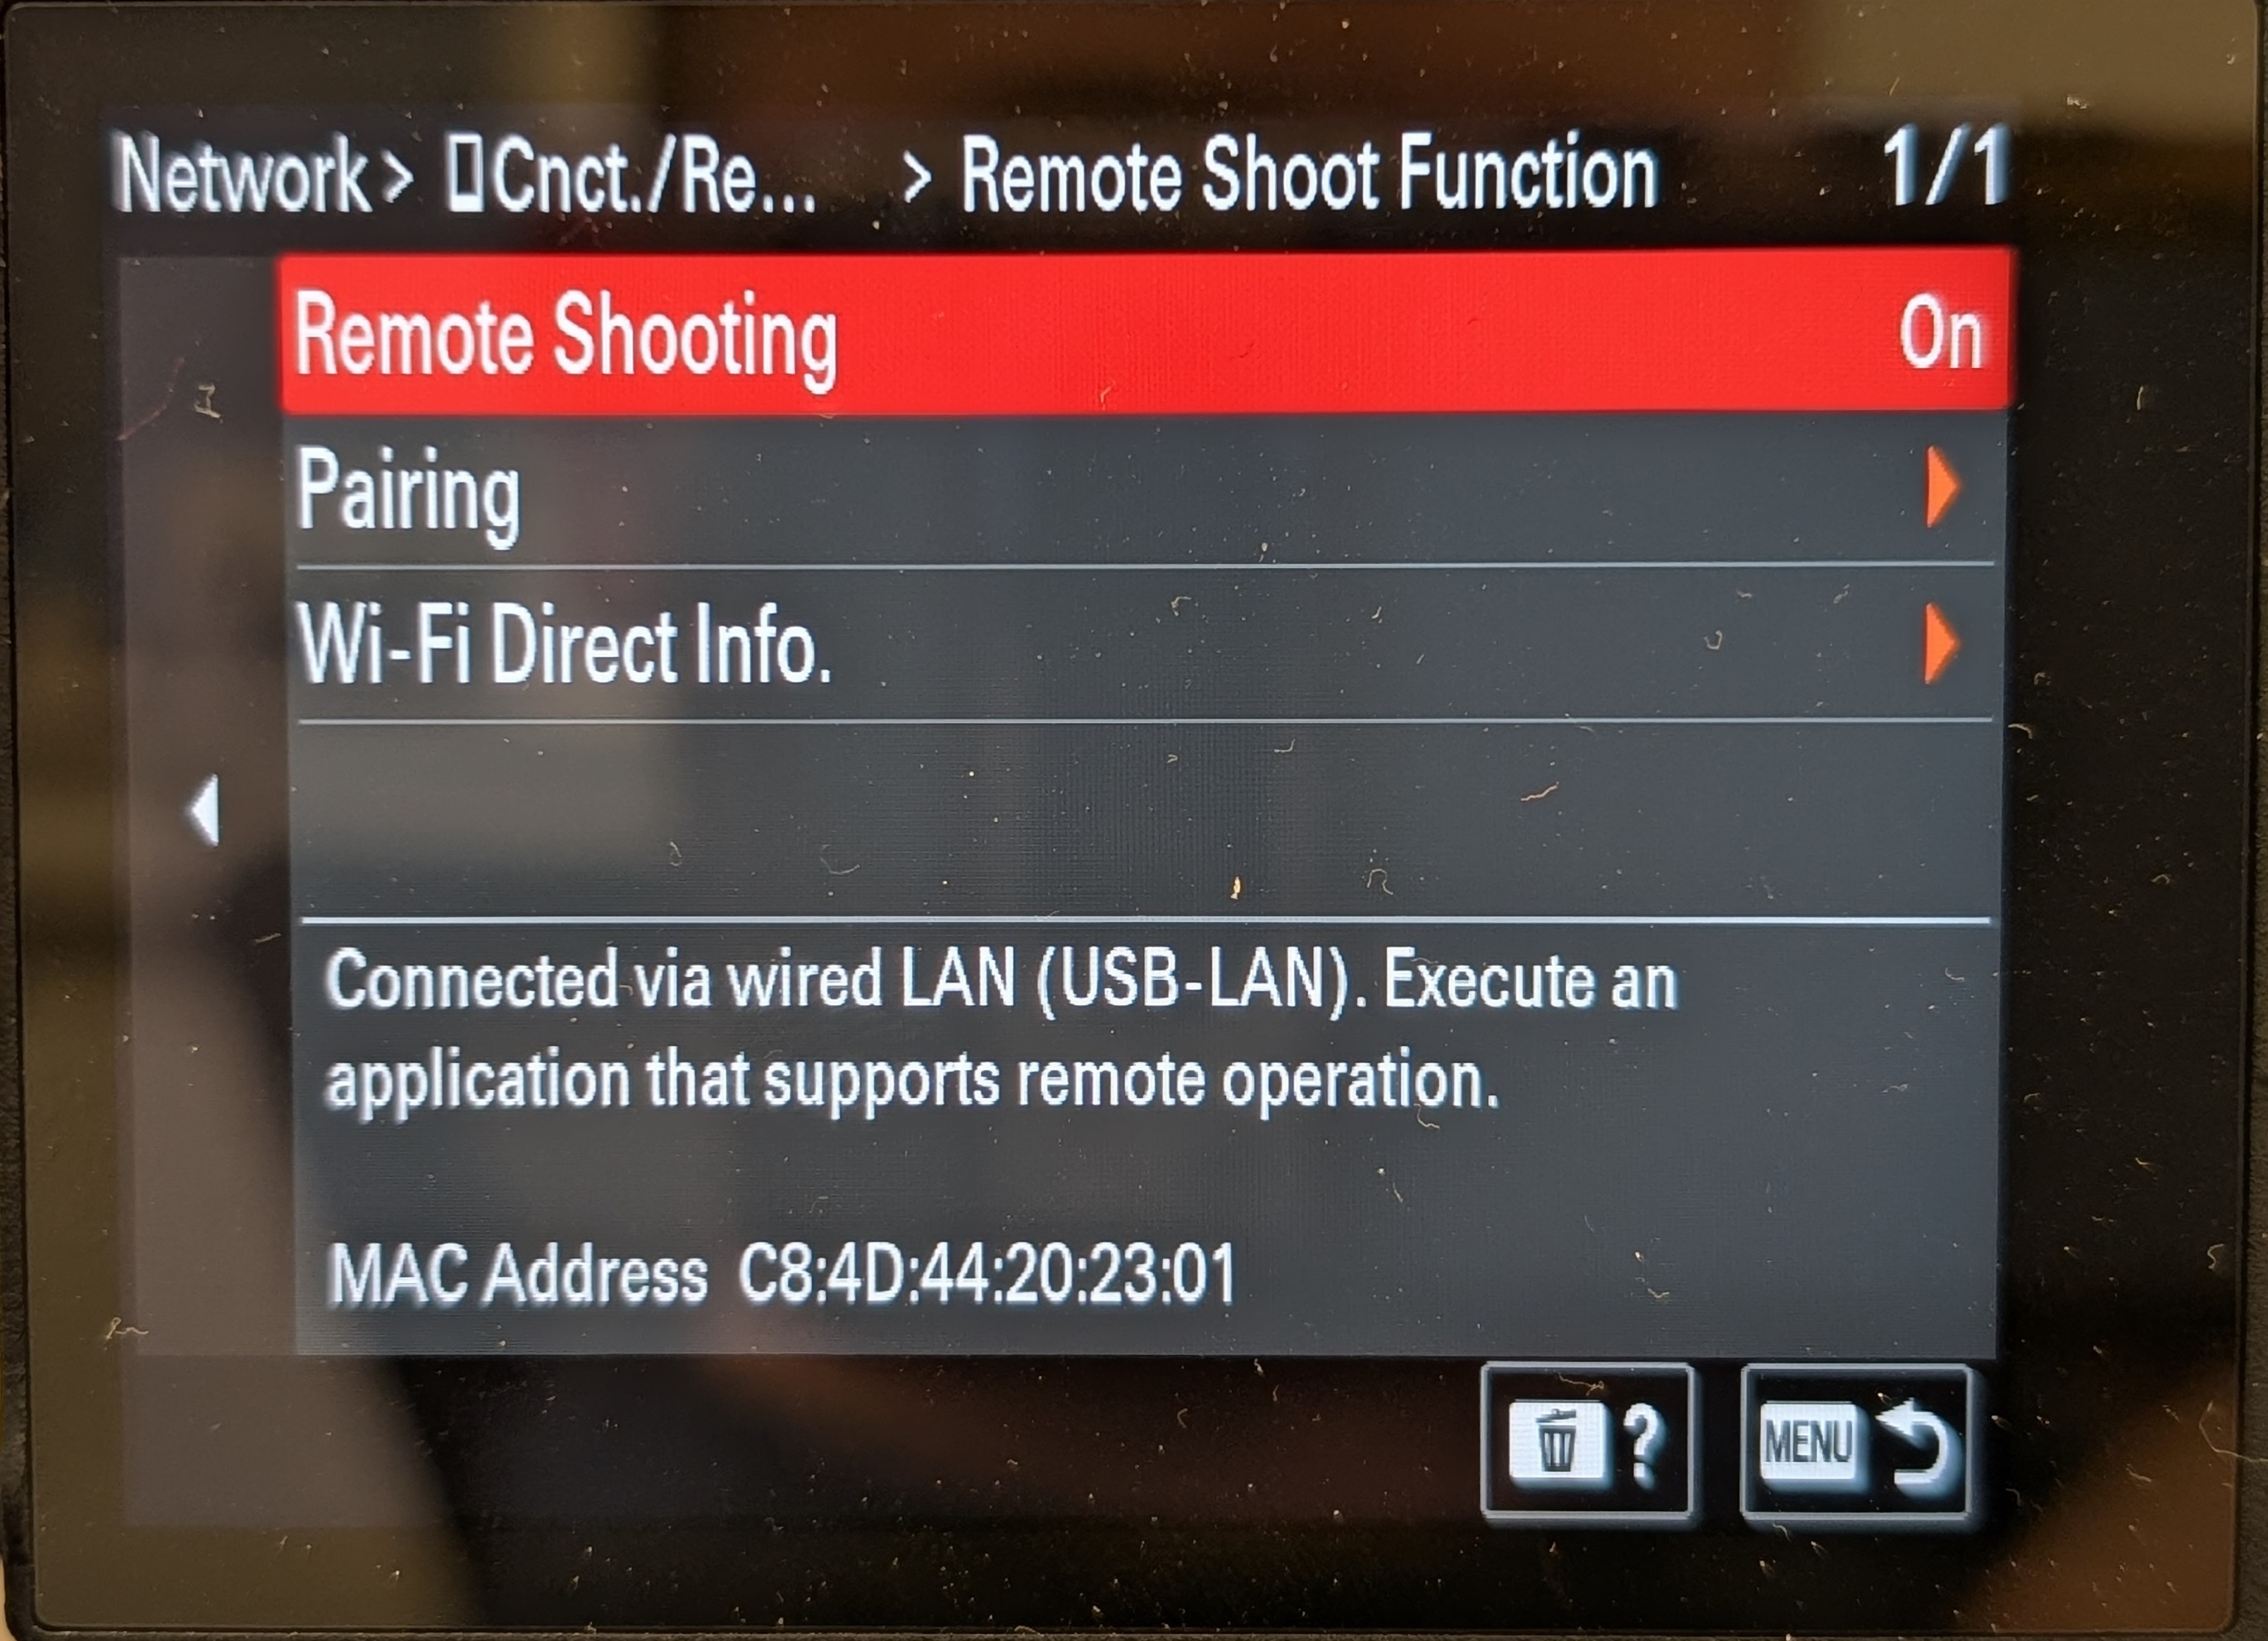
-
Start pairing:
MENU→Network→Cnct./Remote Sht→Remote Shoot Function→Pairing. With the camera in pairing mode, configure it on the RCP.
RCP Configuration
Add the camera as an IP camera using brand Sony and model Alpha - IP.

Once the RCP reaches the camera, the FX3 asks to pair the device. It is named Cyanview so you can recognise it — select OK. Once paired, you can control the camera.
Over IP the FX3 accepts a single controller. If the Sony Monitor & Control app, another RIO, or another RCP is already connected to the camera, no further connection can be established and the camera icon stays red. Make sure nothing else is connected to the camera before pairing.
Troubleshooting
Camera icon stays RED / camera not detected
Check in this order:
- Use a USB data cable — verify the cable is data-capable, not power-only. This is the most common cause of a red camera icon.
- Enable PC Remote Function / set the USB mode — the FX3 needs
USB Connection Modeset to Remote Shooting for USB control (see USB Control). - For IP control, verify the dongle and network settings — a red icon with no camera info usually means an incompatible USB-to-Ethernet adapter (see adapter compatibility).
- Update RIO / RCP firmware — use the latest version (including beta/RC) delivered as a SWU file. The Sony protocol is implemented at OS level; an app-only upgrade is not sufficient.
- Power cycle — restart the camera (remove battery/PSU if needed) and retry.
- Check for conflicting control (IP) — over IP the camera accepts only one controller at a time. If the Sony app or another RIO/RCP is already connected, any further connection fails and the icon stays red. Disconnect the other controller.
FX3 is not controllable
Ensure the FX3 is on firmware version 3.00 or above and the RCP/RIO is on version 23.8.1 or above (FX3A requires 25.10.1beta2 or above). The protocol evolves with the camera firmware and the RCP/RIO must be updated to remain compatible (and vice versa).
White Balance not controllable
Ensure ATW is set to Off in the RCP under Camera > WB > ATW. The camera white balance mode must be set to manual/color temperature.
Some parameters are displayed but do not change
Depending on the shooting mode, some parameters will be fixed or set to Auto and therefore read-only. Switch to a manual mode (M, S&Q, etc.).
Unstable link
- Check the camera settings and disable power-over-USB if available.