Panasonic AU-EVA1
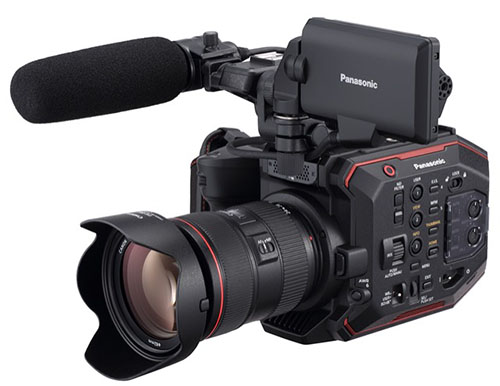
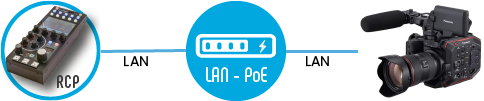
The Panasonic AU-EVA1 is a compact cinema camcorder that provides remote control over IP using a USB-to-Ethernet adapter plugged into its USB port. It connects to the Cyanview RCP via a standard Ethernet network. Typical use cases include single-camera shoots, documentary production, and remote shading in broadcast or live event environments.
Supported Models
- AU-EVA1 — requires firmware v3.00-00-0.00 or later
Supported Controls
| Control | Notes | AU-EVA1 |
|---|---|---|
| Iris | Manual and Auto | ✔ |
| ISO / Gain | ✔ | |
| Shutter | ✔ | |
| Auto Exposure | ✔ | |
| White Balance | Auto (ATW), One Push, Manual | ✔ |
| R/B Gains | Not supported by the AU-EVA1 protocol | — |
| Black / Pedestal | Master Black | ✔ |
| Gamma | Master Gamma | ✔ |
| Color Gains | ✔ | |
| Saturation | ✔ | |
| Detail | Enhancement | ✔ |
| Digital Zoom | Not supported on all models | ✔ |
| White Clip | ✔ | |
| Lens | Iris, Focus, Auto Focus, Zoom (zoom block cameras only) | ✔ |
| Menu / OSD | All functions available | ✔ |
| Record | — | |
| Tally | — |
Red and Blue gains are not supported by the AU-EVA1 protocol.
Connection
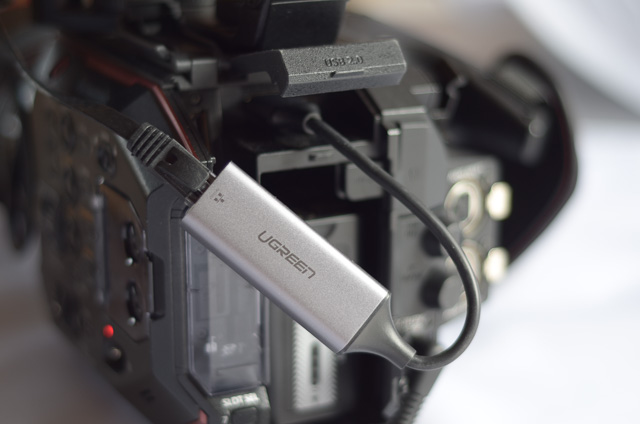
The AU-EVA1 connects to the Cyanview RCP over IP/Ethernet via a USB-to-Ethernet adapter plugged into the USB port at the top back of the camera. Both the camera and the RCP must be on the same IP network.
USB-Ethernet Adapter Compatibility
Not all USB-to-Ethernet adapters are compatible. The following are known to work:
- UGREEN USB 3.0 to Ethernet RJ45 Lan Gigabit Adapter (SKU 20256) — order the USB 3.0 version, not the USB 2.0
- Plugable USB3.0 Gigabit Ethernet Adapter
- BUFFALO Wired LAN adapter LUA4-U3-AGT
Use only the adapters listed above. Other models are not guaranteed to work.
Required Accessories
Required:
- Compatible USB-to-Ethernet adapter (see USB-Ethernet Adapter Compatibility above)
Optional:
- PoE network switch or injector — to power the RCP on the same network segment
Configuration
Camera Configuration
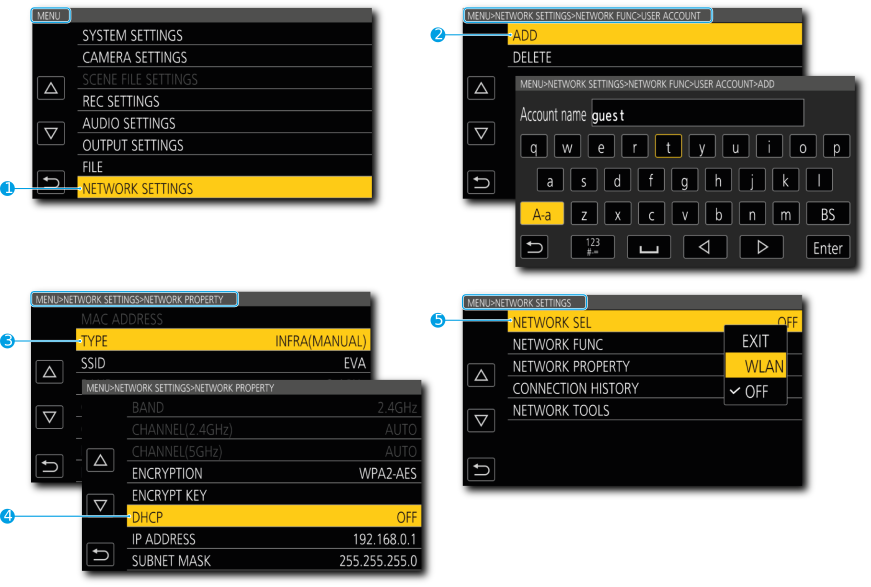
Configure the following settings directly on the camera:
Firmware
Verify that the camera firmware is version 3.00-00-0.00 or later.
Network / IP Settings
In Menu > NETWORK SETTINGS > NETWORK PROPERTY:
- Set
TYPEtoINFRA(MANUAL) - Set
DHCPtoOFF - Assign a static IP address (default:
192.168.0.1)
In Menu > NETWORK SETTINGS:
- Set
NETWORK SELfromOFFtoWLAN
Authentication
In Menu > NETWORK SETTINGS > NETWORK FUNC:
- Either delete all existing accounts, or add an account with:
- Username:
guest - Password:
auguest(all lowercase)
- Username:
Apply Changes
When changing network configuration or user account, it is usually required to power cycle the camera to apply the changes.
Power cycle the camera to apply all network changes.
RCP Configuration
Add the camera as an IP camera.
- Select brand Panasonic and model EVA1
- Enter the camera IP address (default:
192.168.0.1) - Use login
guestand passwordauguest
Troubleshooting
Camera icon stays RED / camera not detected
Check in this order:
- Verify firmware — confirm the camera is running firmware v3.00-00-0.00 or later.
- Verify network settings — confirm
NETWORK SELis set toWLAN,DHCPisOFF, and the static IP is correctly set (see Camera Configuration above). A firmware update often resets these settings. - Verify authentication — confirm the
guest/auguestaccount exists underNETWORK FUNC, or that all accounts have been deleted. - Verify USB adapter — ensure you are using one of the compatible USB-to-Ethernet adapters. Incompatible adapters are a common cause of connection failure.
- Ping the camera from a computer — set the computer to the same IP range and ping the camera IP to confirm basic network connectivity.
- Ping the RCP from the same computer — confirms the RCP and camera are on the same subnet.
- Power cycle — restart the camera (remove battery/PSU if needed) and retry.
A specific parameter is not controllable
- Confirm Red/Blue gains are not expected — they are not supported by the AU-EVA1 protocol.
- Check that the camera firmware meets the minimum version requirement (v3.00-00-0.00).
Unstable connection / camera drops in and out
- Verify you are using a compatible USB-to-Ethernet adapter.
- Try a different adapter from the known-compatible list.
- Ensure the USB connector is fully seated in the camera's USB port.
Camera firmware update broke control
- Firmware updates often reset network settings and user accounts. Re-apply all settings from Camera Configuration and power cycle the camera.
- As a general rule: do not update camera firmware during a live production. Test first in a controlled environment.